
© 2022 Grant Thornton LLP | All rights reserved | U.S. member firm of Grant Thornton International Ltd
Azure Marketplace
Installation Guide

1
© 2023 Grant Thornton LLP | All rights reserved | U.S. member firm of Grant Thornton International Ltd
Table of Contents
Prerequisites ............................................................................................................................... 2
Azure AD App Registration ......................................................................................................... 2
Marketplace Install ...................................................................................................................... 6
App Registration Redirect URL ................................................................................................. 10
Post Installation Configuration ................................................................................................... 12
Troubleshooting / Rollback ........................................................................................................ 13
SMTP Configuration (Optional) ................................................................................................. 14
Update key vault secrets .......................................................................................................14
Email Frequency ...................................................................................................................15
Changing the Recurring Job Frequency ................................................................................15
2
© 2023 Grant Thornton LLP | All rights reserved | U.S. member firm of Grant Thornton International Ltd
Prerequisites
To complete the installation of qm.x into your Azure Subscription, you must have the following:
• An Azure Subscription
• Rights in Azure AD for creating Application Registrations
• Owner rights in the subscription where qm.x will be installed for the creation of a resource group
and corresponding resources
• Configured logging and analytics
o Additional information can be found here:
https://learn.microsoft.com/en-us/azure/app-service/troubleshoot-diagnostic-logs
https://learn.microsoft.com/en-us/azure/app-service/monitor-app-service
Azure AD App Registration
Before you begin the application installation from the Marketplace, you must create an app registration for
integration with Azure AD for authentication of users.
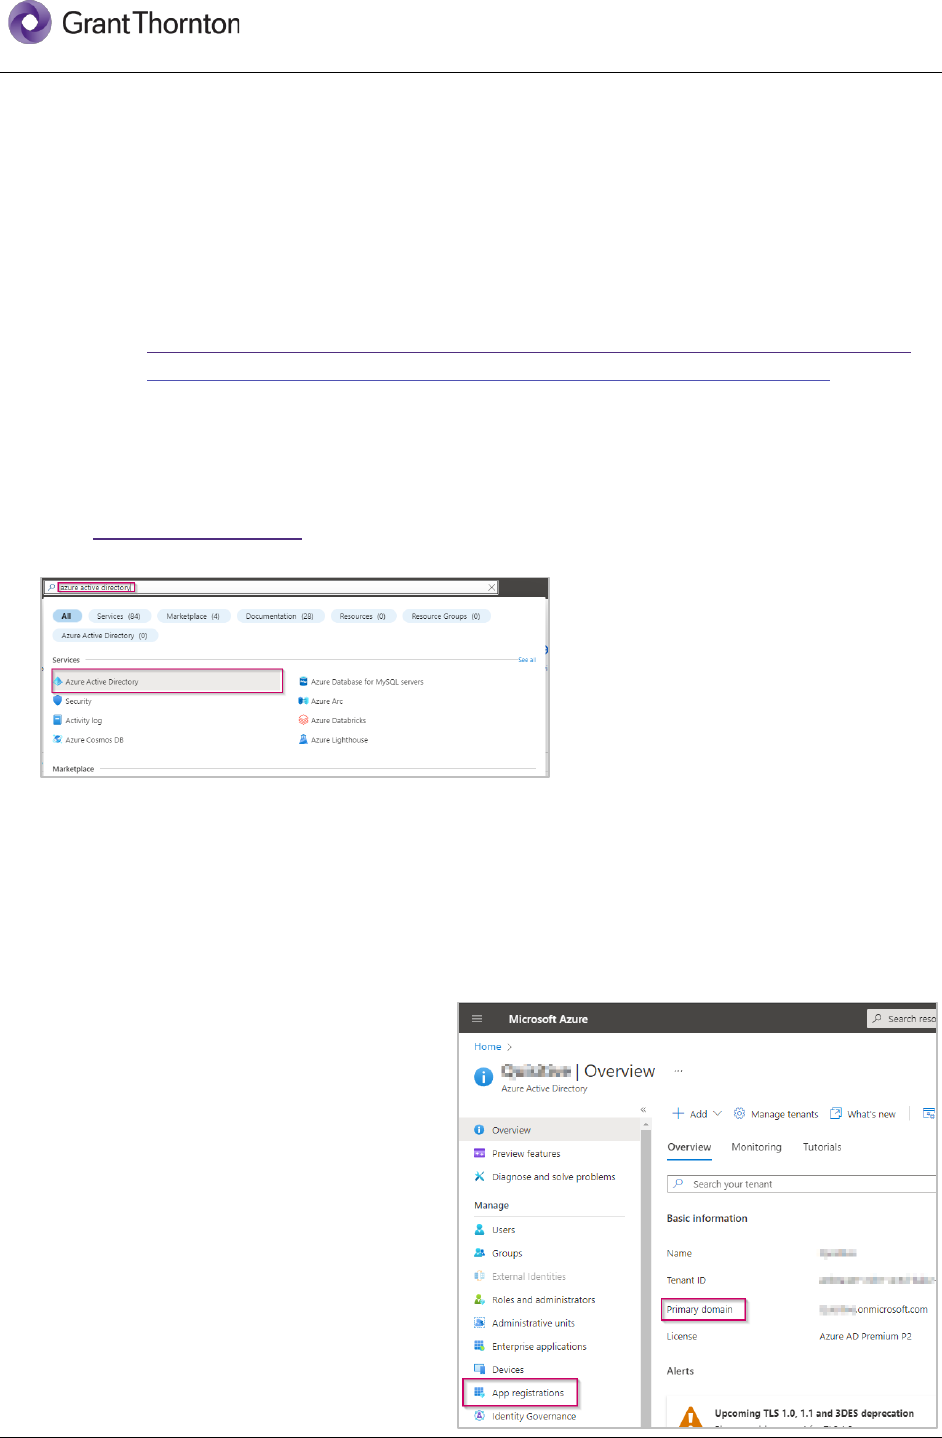
1. Open https://portal.azure.com and type in the search box Azure Active Directory and select it to pull
up the Azure Active Directory blade.
Over the next several steps, we will be configuring the application registration and capturing the following
inputs used later during the qm.x application installation process:
• Tenant ID
• Azure AD Domain
• Client ID
• Client Secret
It is recommended that you open an instance of Notepad to temporarily capture these values for later
use.
2. The first value to capture is available on the
initial screen: Azure AD Domain. Copy the
value labeled Primary domain, which
should end in “.on microsoft.com”, and
paste that value into Notepad.
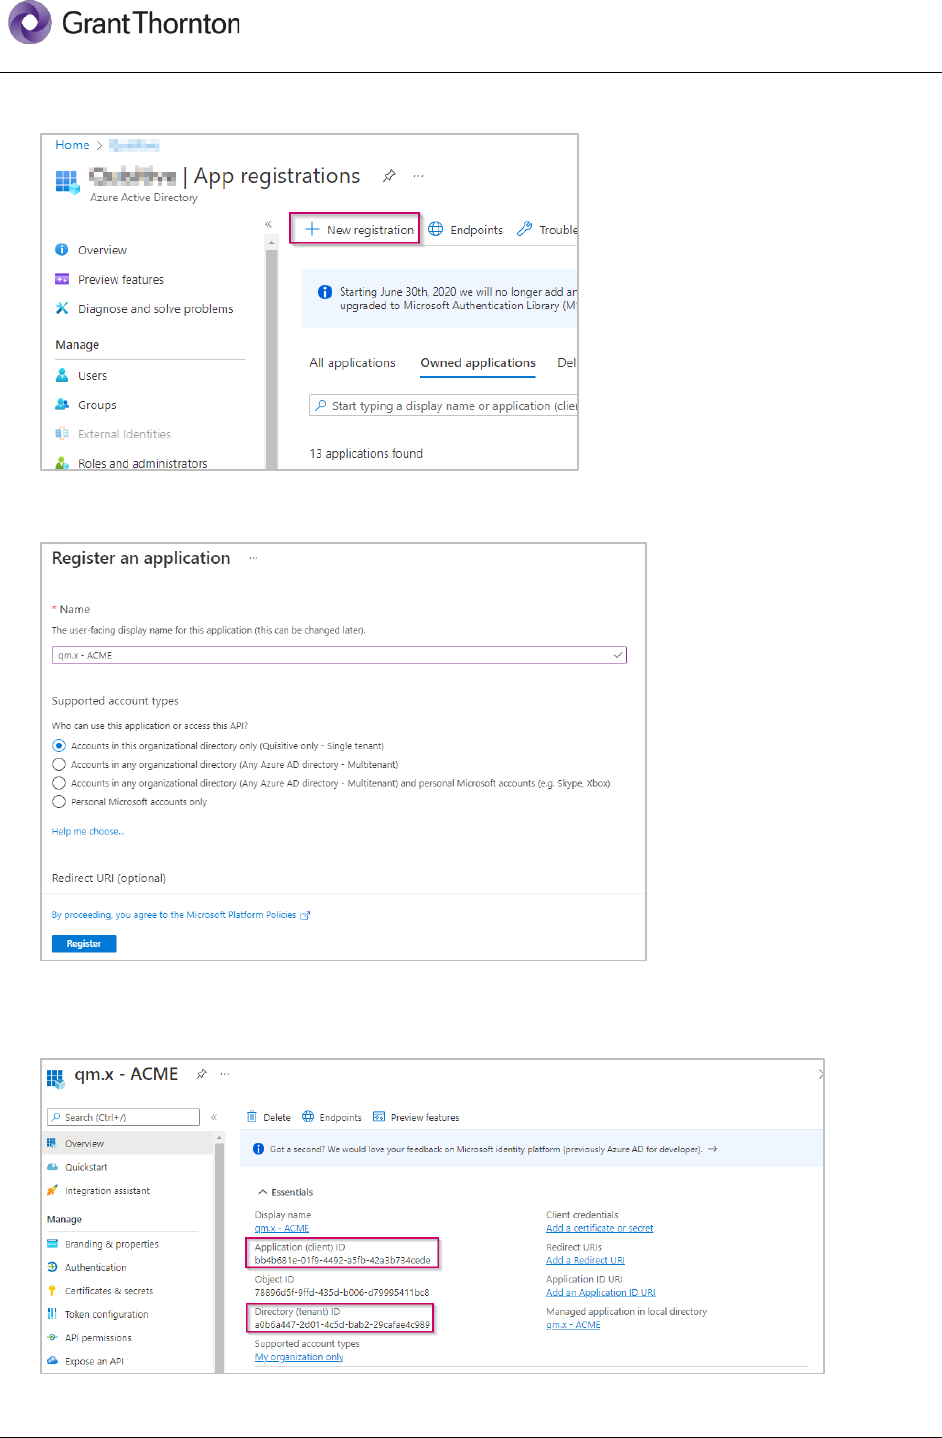
3. Next, select App Registrations from the
left-hand menu:
3
© 2023 Grant Thornton LLP | All rights reserved | U.S. member firm of Grant Thornton International Ltd
4. Click the toolbar item to create a New Registration.
5. Enter a descriptive name for the qm.x installation. Leave all other values in their default state, and
then click Register.
6. The next two values that need saving are available on the next screen (client ID and tenant ID). Take
a moment to copy these values into Notepad. You may want to label them, so they don’t get mixed
up.

4
© 2023 Grant Thornton LLP | All rights reserved | U.S. member firm of Grant Thornton International Ltd
The remaining steps configure the qm.x application with the required permissions and settings. Once
the qm.x application is installed, we will come back to this app registration and update a setting
required for redirecting logins back to the installed application.
7. Select “Certificates & Secrets” from the left-hand menu, and then click New Client Secret.
8. Enter a Description, such as “authentication”, and set an expiration date according to your company’s
policies.
NOTE: Expired client secrets must eventually be updated in the Key Vault resource deployed by the
application.
9. After creating the secret, use the copy icon to copy the Client Secret Value and paste into Notepad
IMPORTANT: The secret value will not be shown again after leaving this screen.
This is the final value to capture, but there are still a few more steps to complete the app registration
process.
10. qm.x requires an additional delegated permission to allow the application to look up users on behalf
of the signed in user. The next step is to add the required permission by selecting the API
Permissions menu item on the left, and then select Add a permission.

5
© 2023 Grant Thornton LLP | All rights reserved | U.S. member firm of Grant Thornton International Ltd
11. Select the Microsoft Graph option.
12. Select Delegated Permissions, then type “User.ReadBasic.All” in the search box.
13. Expand and select the check box for the permission, and then click the Add permissions button.
14. The permission screen should now show the following.
15. At this point, we are now ready to proceed with the installation of qm.x. Keep this browser tab open
as you will revisit after the application installation has completed.

6
© 2023 Grant Thornton LLP | All rights reserved | U.S. member firm of Grant Thornton International Ltd
Marketplace Install
1. Open https://portal.azure.com in a new browser tab.
2. Under Azure Services, select the Marketplace option.
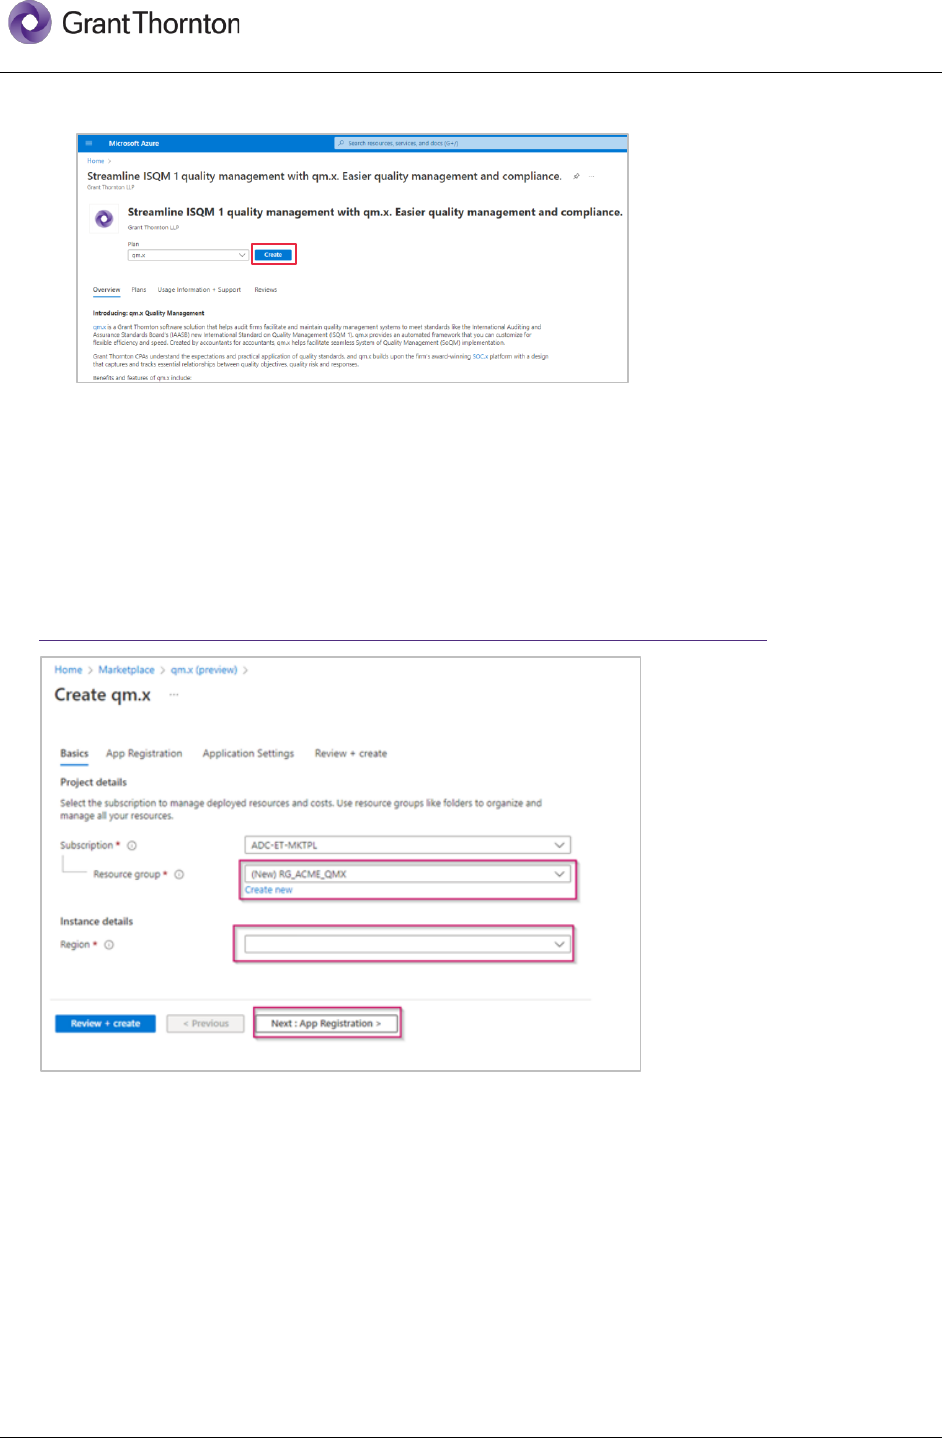
3. In the search box, search the Marketplace for qm.x.
4. Click the qm.x product
7
© 2023 Grant Thornton LLP | All rights reserved | U.S. member firm of Grant Thornton International Ltd
5. Click Create to begin the installation process.
The installation is separated into three parts, with the first being the resource group, the second being
the details required for qm.x to authenticate against your Azure AD tenant (an App Registration), and
the third being the names for provisioned resources.
6. Select to create a new Resource Group and select your organization’s appropriate Region from the
drop down for deployment.
NOTE: An existing resource group can be used, although a new one is recommended. It is also
recommended that the resource group region be chosen to reflect the correct geographical location at
the time of installation. Moving regions after resource group creation is not supported by the qm.x
Support team. If this becomes required, please refer to the Microsoft Learn link for more information:
Move resources to another region with Azure Resource Mover | Microsoft Learn

8
© 2023 Grant Thornton LLP | All rights reserved | U.S. member firm of Grant Thornton International Ltd
7. The values copied to Notepad in the creation of the app registration steps are now entered into the
App Registration section as shown below. After entering the fields, click Next: Application Settings.
8. This section controls the resource names used when deploying qm.x. Fill out the resource fields
according to the standards of your organization.
For example, for ACME, the following resource names will be used following an “<organization>-<app
name>-<recommended abbreviation>-<instance number>” format.
• App Service Plan Name: acme-qmx-plan-01
• App Service Name: acme-qmx-app-01
• App Configuration Name: acme-qmx-appcs-01
• Key Vault Name: acme-qmx-kv-01
• SQL Server Name: acme-qmx-sql-01
• Database Name: acme-qmx-sqldb-01
• Log Analytics Workspace Name: acme-qmx-law-01
• App Insights Name: acme-qmx-appi-01
• Storage Account Name: acmeqmxst01
o Note restrictions on storage account names, which do not allow for dashes
This section also captures the administrative username and password for SQL. These values will be
saved in Key Vault after installation for use by the app and recovery by authorized users.
IMPORTANT: The administrator login username is a SQL Server Login, NOT a domain account
login. You cannot use a UPN (User Principal Name) formatted account, for example,
login_name@DomainName.

9
© 2023 Grant Thornton LLP | All rights reserved | U.S. member firm of Grant Thornton International Ltd
9. Enter your resource names and settings, and then click Next: Review + create to continue.
10. The values you provided will be validated and you will
be asked to provide contact information before
installation. When ready, select Create to begin the
installation.
11. The installation may take several minutes to complete.
IMPORTANT: Do not attempt to navigate to any of the resources until the deployment is complete.
Doing so may cause the deployment to fail.)
Once installed, you should see a screen similar to the following.
10
© 2023 Grant Thornton LLP | All rights reserved | U.S. member firm of Grant Thornton International Ltd
App Registration Redirect URL
1. Before launching the application, you must first update the app registration created earlier with the
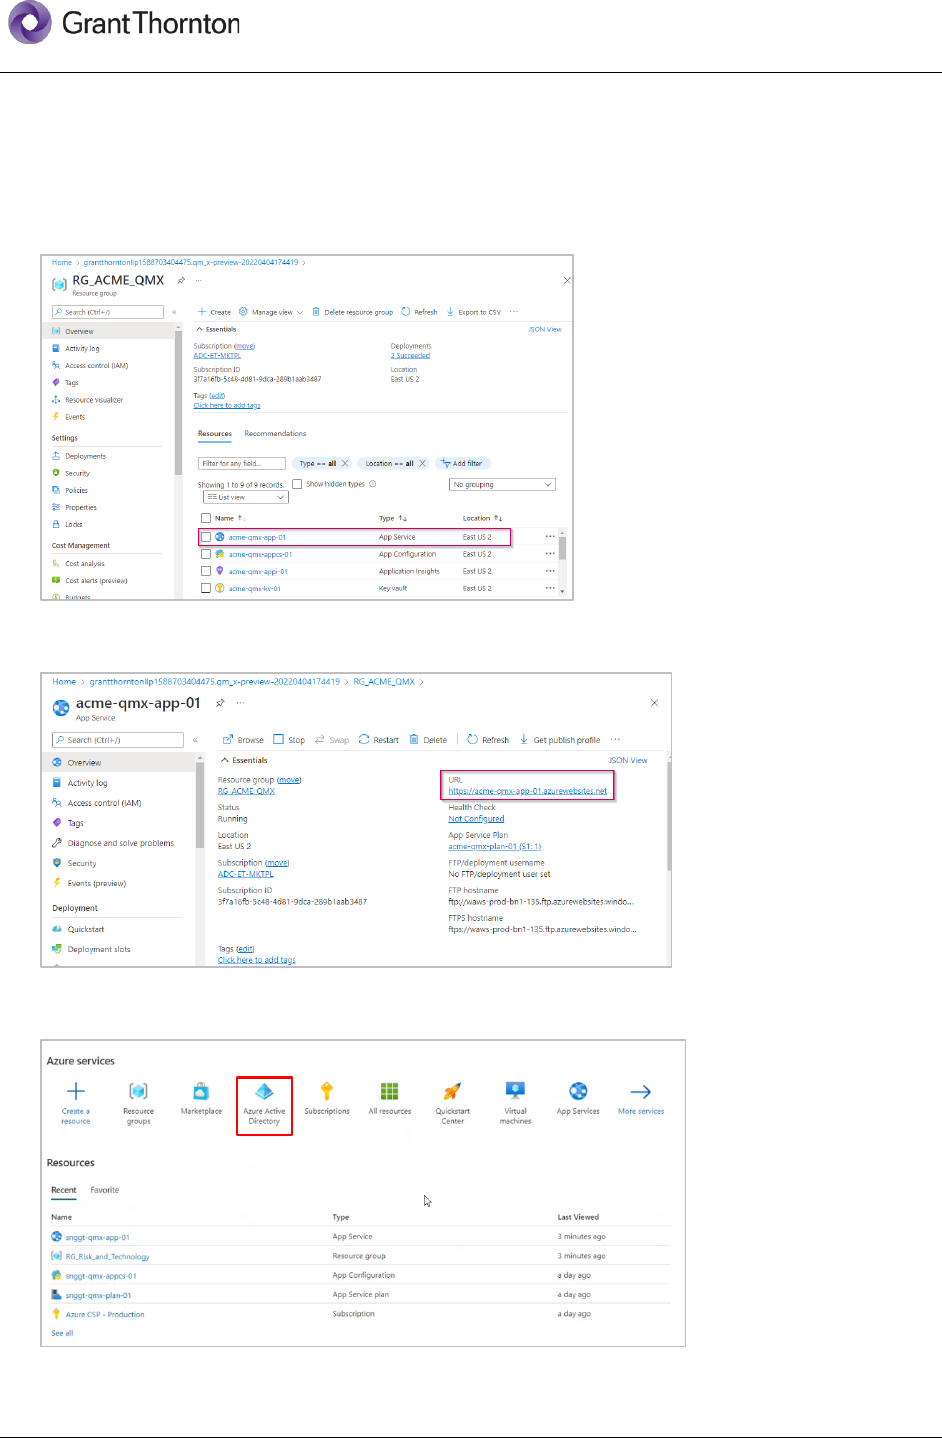
redirect URL for the app service. To get the URL for the app service, click the Go to resource group
button on the deployment screen above, and then click the hyperlinked app service name that was
created in the Resources table.
2. Copy the URL for the app service to the clipboard using the icon that appears when you hover over
the link:
3. Go to Azure Services and click on Azure Active Directory in order to go back to the previous app
registration.
11
© 2023 Grant Thornton LLP | All rights reserved | U.S. member firm of Grant Thornton International Ltd
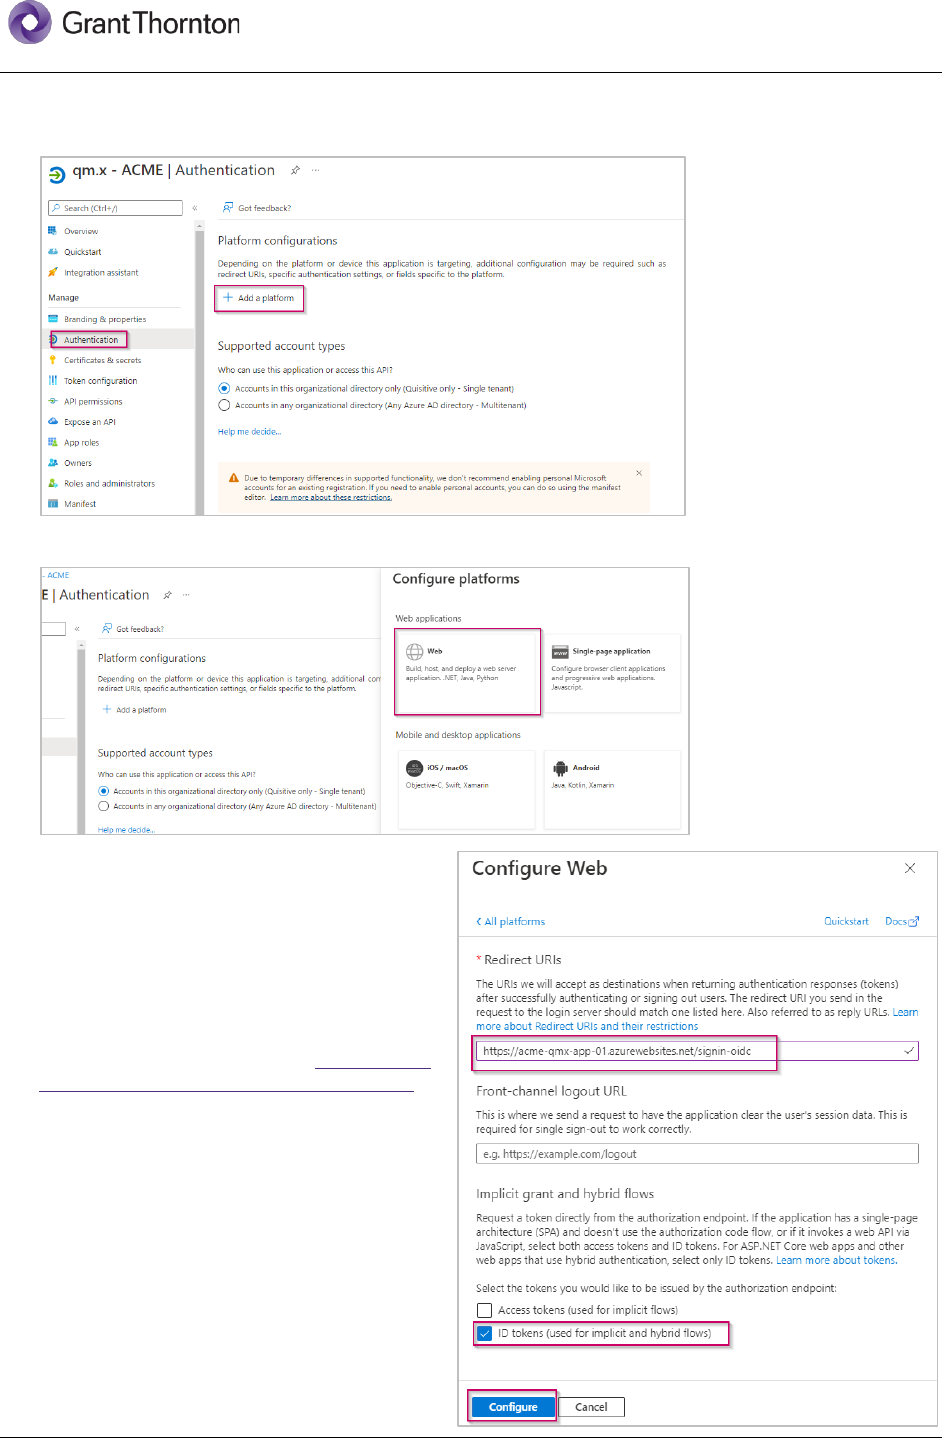
4. Back in the open tab/window for your app registration, select the Authentication menu item on the
left-hand side and then the Add a platform link
5. Select Web under Web applications.
6. For Redirect URIs, add the following, which
is the URL for your app service copied
previously and the following path “/signin-
oidc”.
In this example, the full URL is https://acme-
qmx-app-01.azurewebsites.net/signin-oidc.
7. Next, check the box next to ID tokens, then
click Configure.
12
© 2023 Grant Thornton LLP | All rights reserved | U.S. member firm of Grant Thornton International Ltd
Post Installation Configuration
You may now navigate to the qm.x application by clicking the URL, which will be back in the app service
settings blade. In this example, it is https://acme-qmx-app-01.azurewebsites.net. The initial load of the
application may take several minutes due to just in time compilation and the initialization of the
application database.
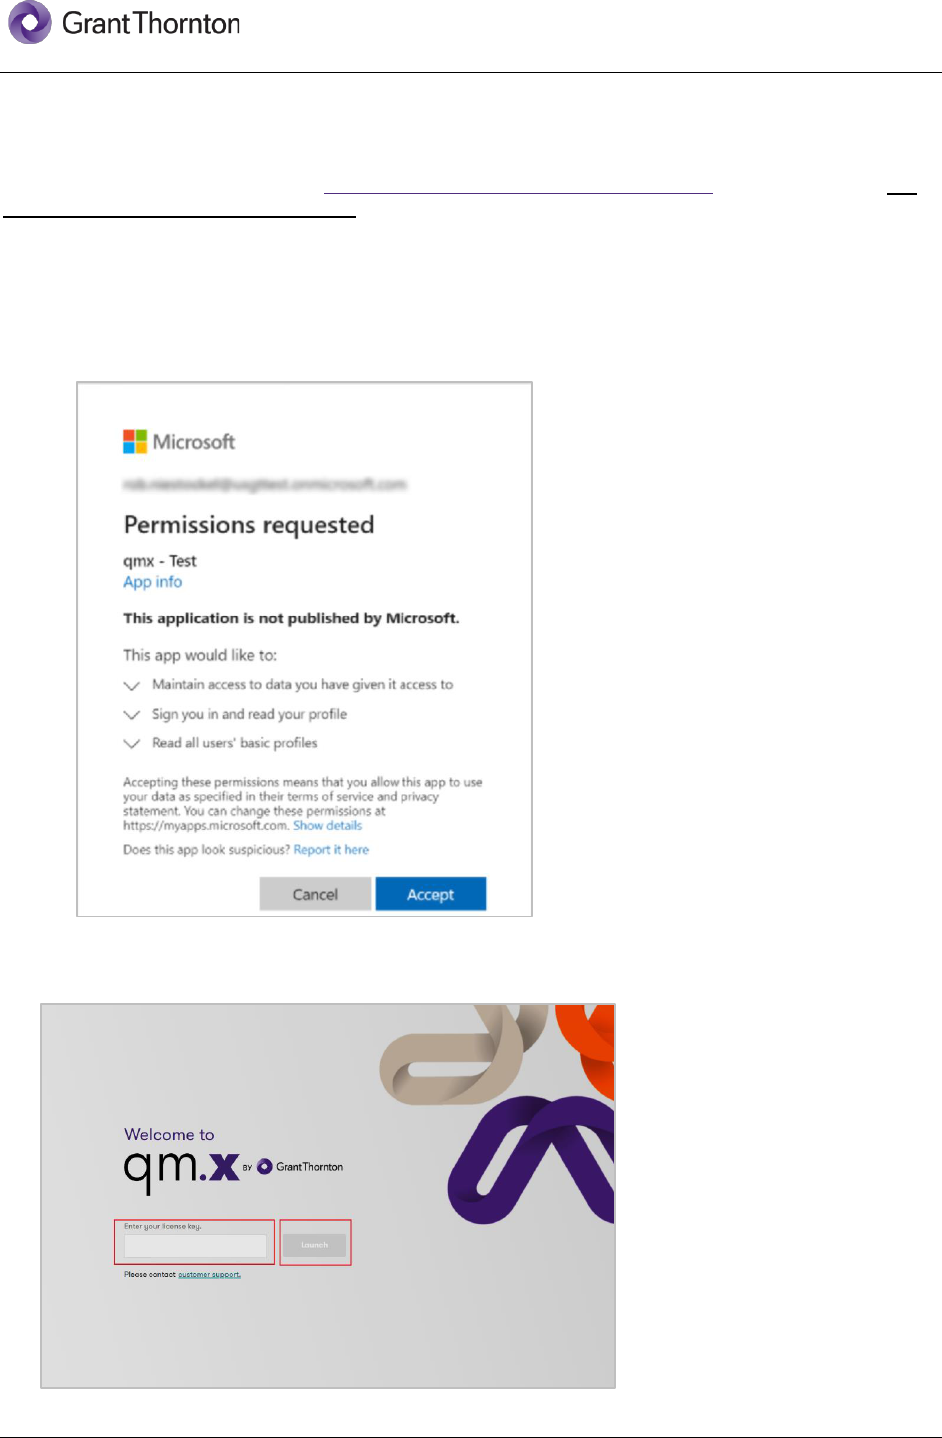
1. When completed, you will be prompted to login using your Active Directory Credentials and to accept
the permissions required by the application.
NOTE: If you have Global Administrator privileges in your tenant, you will also see an additional
check box on this prompt providing you with the option to accept the permissions on behalf of
everyone in your organization. Checking the box is optional and not required.
After doing so you should see the following screen for entering your license key.
2. Enter your license key and click Launch to proceed.
13
© 2023 Grant Thornton LLP | All rights reserved | U.S. member firm of Grant Thornton International Ltd
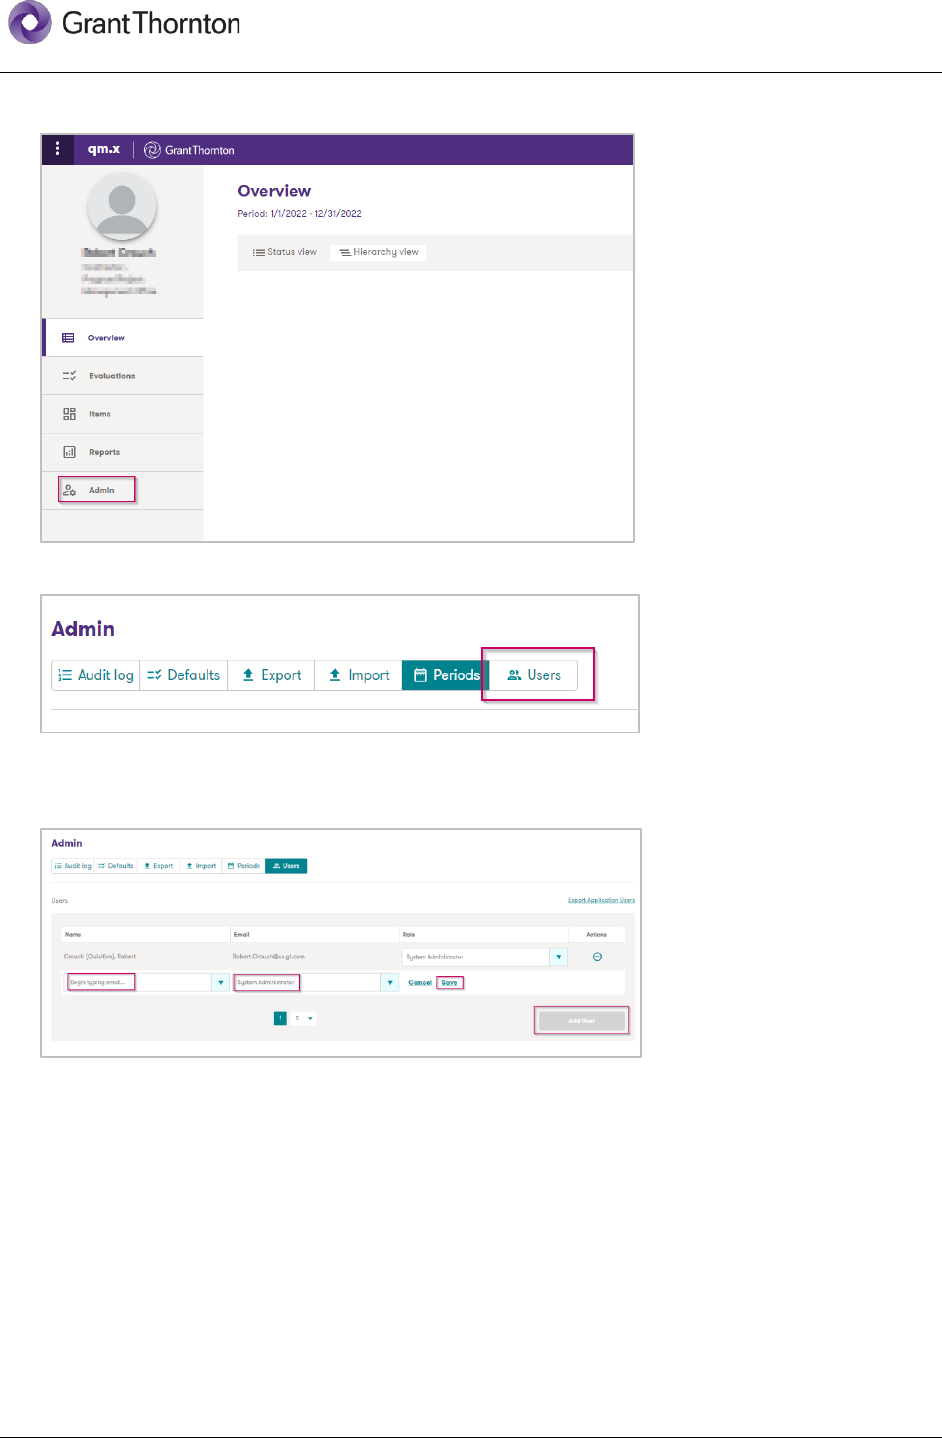
3. After entering your license, click the Admin link.
4. Select Users.
5. On this screen, add the business users that require the System Administrator role. System
Administrators have access to the Admin section, which allows for control over evaluation periods,
default data, importing of data, and addition of additional users to the system.
6. The qm.x application is now installed and ready to be shared with your business owners.
Troubleshooting / Rollback
If the deployment fails or you need to roll back the deployment for any reason, simply delete the
Resource Group you created in step 6 of the Marketplace Install section above . This will delete all
resources within the resource group.
IMPORTANT: Before deleting, check to see if the Key Vault instance was successfully deployed. If so,
you will not be able to use the same name for that resource when attempting another installation. Key
Vault has a built-in soft-delete feature that retains deleted vaults for a default retention period of 90 days.
You cannot reuse the name of a key vault that has been soft-deleted until the retention period has
passed. Therefore, if you elect to reinstall make sure you use a different key vault name or the
deployment will fail.

14
© 2023 Grant Thornton LLP | All rights reserved | U.S. member firm of Grant Thornton International Ltd
Post-Installation
SMTP Configuration (Optional)
The release of qm.x contains a user-notifications feature that supports both in-application
viewing of notifications along with email notifications. The email notification feature is designed
to send a periodic “digest” of accumulated notifications for a given user. In order to take
advantage of the emailing of notifications, you must configure SMTP submission with your
organization’s email server. qm.x does not target or require any specific email platform, only
SMTP. The following instructs how to configure qm.x to utilize SMTP for outbound emails. You
must configure SMTP submission with your organization’s mail server prior to completing these
steps.
NOTE: Due to the many different email platforms that organizations may be using, instructions
for configuring SMTP submission with your organization’s email platform is not provided.
Once you have setup and determined that your SMTP submission is working with your mail
server (outside of qm.x), follow the steps below to configure qm.x to connect and use it.
Before you begin, the following values will be needed from your SMTP resource configuration in
order to proceed:
• SMTP Host Name
• Port
• Username
• Password
• Email address to use as sender
Update key vault secrets
Navigate to your Key Vault service and select the Secrets blade.
NOTE: The ability to view and modify Key Vault secrets requires an Access Policy to be in place
that grants those permissions. If you get an unauthorized message when you attempt to view
the secrets, you will need to add an Access Policy using the steps below:
1. Select Access policies
2. + Add Access Policy
3. Select the Key & Secret Management template
4. Select principal (your user account)
5. Click Add
6. Click Save
Once you have successfully added an Access Policy:
1. Select the Secrets blade
2. Select smtp-username secret
3. + New version
4. Enter your SMTP connection Username into the value text box
5. Click Create
Repeat the above steps for the smtp-password secret.
15
© 2023 Grant Thornton LLP | All rights reserved | U.S. member firm of Grant Thornton International Ltd
Update App Configuration Key/Value Settings
Next, navigate to the qm.x App Configuration service
Select the Configuration Explorer blade under Options
Edit each of the following configuration key values and provide the applicable values for your
SMTP configuration:
Application:SMTP:Host
SMTP hostname or IP address
Application:SMTP:Port
SMTP port, typically 587
Application:SMTP:FromAddress
Email address that will be used as the
“sender” address
The recurring job should now detect your SMTP configuration and begin to send daily
notification digest emails.
Email Frequency
qm.x uses an internal recurring timer job mechanism for connecting to SMTP and sending
notification emails. The default configuration is set to execute the email send operation daily at
10:00am UTC time (6:00am EST). You can alter this schedule if desired.
Changing the Recurring Job Frequency
qm.x utilizes two recurring timer jobs to perform periodic operations:
1. Notification email sending
2. Purging aged notifications
The timer jobs use the CRON format to define the recurring execution schedule. You can alter
the CRON value by editing the RecurringJob:NotificationEmailCRON and/or
RecurringJob:NotificationPurgeCRON configuration value.
The default notification email CRON schedule value is:
0 10 * * *
This value specifies a daily execution at 10:00 am UTC. As an example, to change the schedule
to run at 14:00 UTC daily (2:00pm UTC), the value would be:
0 14 * * *
Details on how CRON works can be found at the following link:
https://en.wikipedia.org/wiki/Cron#CRON_expression
A helpful utility to help you define a desired CRON schedule can be found at the following link:
https://crontab.guru/#0_10_*_*_*
IMPORTANT: In order for your CRON changes to take effect, you need to navigate to your
qm.x App Service and Stop/Start the service. You should perform this step outside of normal
business hours as it will cause brief downtime of the qm.x application.
