User's Manual
English
ART46090-003_rev-A 08-Apr-22 12:30pm
ART46090-003_rev-A 08-Apr-22 12:30pm
User's Manual
App Symbols
App icon
Alarms you have turned on are
unavailable
Scan New Sensor/Start New Sensor
Direction your glucose is going. See
Understanding Your Glucose
Readings for more information.
Caution
Add/edit notes
Food note
Insulin (Rapid or Long-acting) note
Alarm
Exercise note
Time change
Main menu
Multiple/Custom notes
⚌
ART46090-003_rev-A 08-Apr-22 12:30pm
Share report
Additional information
Calendar
Sensor too cold
Sensor too hot
Important Information
Indications for Use
FreeStyle Libre 3 app (‘App’) when used with a FreeStyle Libre 3 Continuous Glucose
Monitoring System Sensor (‘Sensor’) is indicated for measuring interstitial fluid
glucose levels in people (age 4 and older) with diabetes mellitus, including
pregnant women. The App and Sensor are designed to replace blood glucose
testing in the self-management of diabetes, including dosing of insulin.
The indication for children (age 4–12) is limited to those who are supervised by a
caregiver who is at least 18 years of age. The caregiver is responsible for managing
or assisting the child to manage the App and Sensor and also for interpreting or
assisting the child to interpret Sensor glucose readings.
Compatible Devices, Apps and Software
For a list of compatible devices, apps and software that can be used with the
FreeStyle Libre 3 Sensor, please go to:
www.FreeStyleLibre.com
Use of the Sensor with devices, apps and software that are not listed may cause
inaccurate glucose readings.
WARNINGS
ART46090-003_rev-A 08-Apr-22 12:30pm
If you are using the FreeStyle Libre 3 app, you must also have access to a blood
glucose monitoring system as the App does not provide one.
CAUTION:
The FreeStyle Libre 3 app installed on a phone is intended for use by a single
person. It must not be used by more than one person due to the risk of
misinterpreting glucose information.
For you to receive alarms, make sure to:
Turn alarms ON and ensure that your phone is within 10 metres (33!ft) of you
at all times. The transmission range is 10 metres (33!ft) unobstructed. If you
are out of range, you may not receive alarms. If you want to receive the App's
optional alarms, make sure these are turned on.
Do not force close the App. The App must be running in the background to
receive alarms. If you force close the App you will not receive alarms. Re-open
the App to ensure you will receive alarms.
If you restart your phone, open your App to make sure it’s working properly.
The App will ask for phone permissions which are needed to receive alarms.
Allow these permissions when requested.
Check to make sure that you have the correct phone settings and permissions
enabled. If your phone is not configured properly, you will not receive alarms.
Your phone should be configured as follows:
In the phone settings
Keep Bluetooth ON
Keep phone Media volume ON
Keep Battery Saver mode OFF
In the phone settings for the App
Keep Show Notifications ON
Keep Do Not Disturb access permission ON
Keep Battery Optimisation OFF
Do NOT modify channel notification settings for the App
ART46090-003_rev-A 08-Apr-22 12:30pm

Keep Lock Screen notifications ON
Keep Pop-up notifications ON
You may need to add the FreeStyle Libre 3 app to the list of apps that will
not be restricted or put to sleep.
If you adjust the phone Media volume to silent or use the phone do not
disturb setting, turn ‘Override Do Not Disturb’ setting in the App ON for
Low Glucose, High Glucose and Signal Loss Alarms to ensure you receive
audible alarms.
Note: You must accept the App’s permission request for Do Not Disturb
access to use the Override Do Not Disturb feature. You can also enable the Do
Not Disturb access setting directly from the App's notification settings.
You should disconnect headphones or speakers from your phone when you
are not using them as you may not hear audio for alarms. If using
headphones, keep them in your ears.
If you are using peripheral devices connected to your phone, such as wireless
headphones or a smartwatch, you may receive alarms on only one device or
peripheral, not all.
Keep your phone well charged and turned on.
Disable your phone’s automatic operating system updates. After an operating
system update, open your App and check your device settings to make sure
it’s working properly.
Do not use the Android Digital Wellbeing app. It may impact your ability to
receive alarms.
Security Information
You are responsible for properly securing and managing your phone. If you
suspect an adverse cybersecurity event related to the FreeStyle Libre 3 app,
contact Customer Service.
Make sure that your phone and Sensor kit are kept in a safe place, under your
ART46090-003_rev-A 08-Apr-22 12:30pm

control. This is important to help prevent anyone from accessing or tampering
with the System.
The FreeStyle Libre 3 app is not intended for use on a phone that has been
altered or customised to remove, replace or circumvent the manufacturer’s
approved configuration or use restriction, or that otherwise violates the
manufacturer’s warranty.
The following Contraindication, Warnings and other safety information apply
to the Sensor, when used with the FreeStyle Libre 3 app.
CONTRAINDICATION: The Sensor must be removed prior to Magnetic Resonance
Imaging (MRI).
WARNING: Do not ignore symptoms that may be due to low or high blood
glucose. If you have symptoms that do not match the Sensor glucose reading, or
suspect your reading may be inaccurate, check the reading by conducting a
fingerstick test using a blood glucose meter. If you are experiencing symptoms
that are not consistent with your glucose readings, consult your healthcare
professional.
CAUTION:
The Sensor contains small parts that may be dangerous if swallowed.
On rare occasions, you may get inaccurate Sensor glucose readings. If you
believe your readings are not correct or are inconsistent with how you feel,
perform a blood glucose test on your finger to confirm your glucose and check
to make sure your Sensor has not come loose. If the problem continues or if
your Sensor is coming loose, remove the current Sensor and apply a new one.
Intense exercise may cause your Sensor to loosen due to sweat or movement of
the Sensor. If your Sensor comes loose, you may get no readings or unreliable
readings, which may not match how you feel. Follow the instructions to select an
appropriate application site.
Some individuals may be sensitive to the adhesive that keeps the Sensor
attached to the skin. If you notice significant skin irritation around or under your
Sensor, remove the Sensor and stop using the Sensor. Contact your healthcare
professional before continuing to use the Sensor.
ART46090-003_rev-A 08-Apr-22 12:30pm
Performance of the Sensor when used with other implanted medical devices,
such as pacemakers, has not been evaluated.
Do not reuse Sensors. The Sensor and Sensor Applicator are designed for single
use. Reuse may result in no glucose readings and infection. Not suitable for re-
sterilisation. Further exposure to irradiation may cause inaccurate results.
Additional Safety Information
Physiological di"erences between the interstitial fluid and capillary blood may
result in di"erences in glucose readings. Di"erences in Sensor glucose readings
between interstitial fluid and capillary blood may be observed during times of
rapid change in blood glucose, such as after eating, dosing insulin or exercising.
Store the Sensor Kit between 2°C and 28°C. While you don’t need to keep your
Sensor Kit in a refrigerator, you can as long as the refrigerator is between 2°C
and 28°C.
If you have a medical appointment that includes strong magnetic or
electromagnetic radiation – for example an X-ray, MRI (Magnetic Resonance
Imaging) or CT (Computed Tomography) scan – remove the Sensor you are
wearing and apply a new one after the appointment. The e"ect of these types of
procedures on the performance of the Sensor has not been evaluated.
The Sensor has not been evaluated for use in persons on dialysis or people less
than 4 years of age.
The Sensor Applicator is sterile unless opened or damaged.
Your Sensor has been tested to withstand immersion into one metre (3 ft) of
water for up to 30 minutes. It is also protected against insertion of
objects!>!12!mm diameter. (IP27)
Do not freeze the Sensor. Do not use if expiry date has passed.
FreeStyle Libre 3 app Overview
IMPORTANT: Read all of the information in this User’s Manual before using the
FreeStyle Libre 3 app with a Sensor. Refer to your phone’s instructions for use for
ART46090-003_rev-A 08-Apr-22 12:30pm

how to use your phone.
The FreeStyle Libre 3 app is available for download from the Google Play Store.
When you’re ready to start using the FreeStyle Libre 3 system, you’ll prepare and
apply a Sensor to the back of your upper arm. You can then use the App to get
glucose readings from the Sensor and store your glucose history and notes. The
Sensor comes in a
Sensor Kit and can be worn on your body for up to 14 days.
Note: The FreeStyle Libre 3 app is only compatible with certain mobile devices and
operating systems. Please check
www.FreeStyleLibre.com for more information
about device compatibility before upgrading your phone or its operating system.
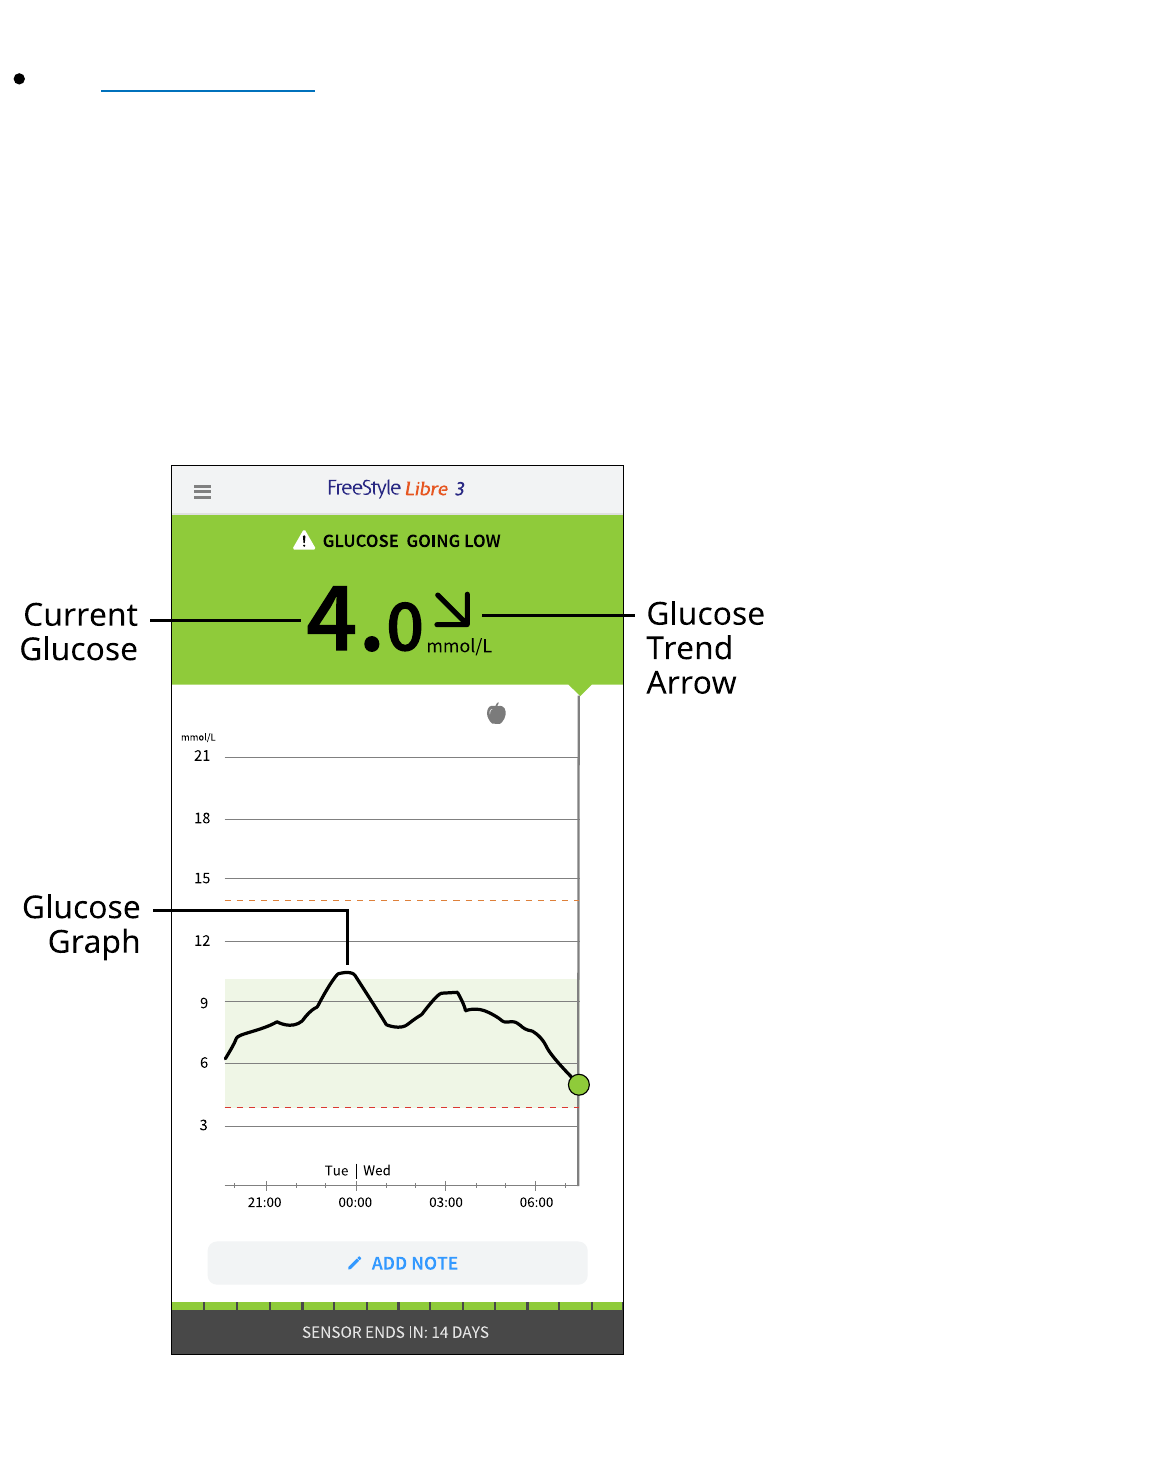
Home Screen
The Home Screen displays your current glucose, glucose trend arrow and glucose
graph. It is automatically updated every minute with glucose data from the Sensor.
To return to the Home Screen from another screen, go to the Main Menu and tap
Home.
ART46090-003_rev-A 08-Apr-22 12:30pm
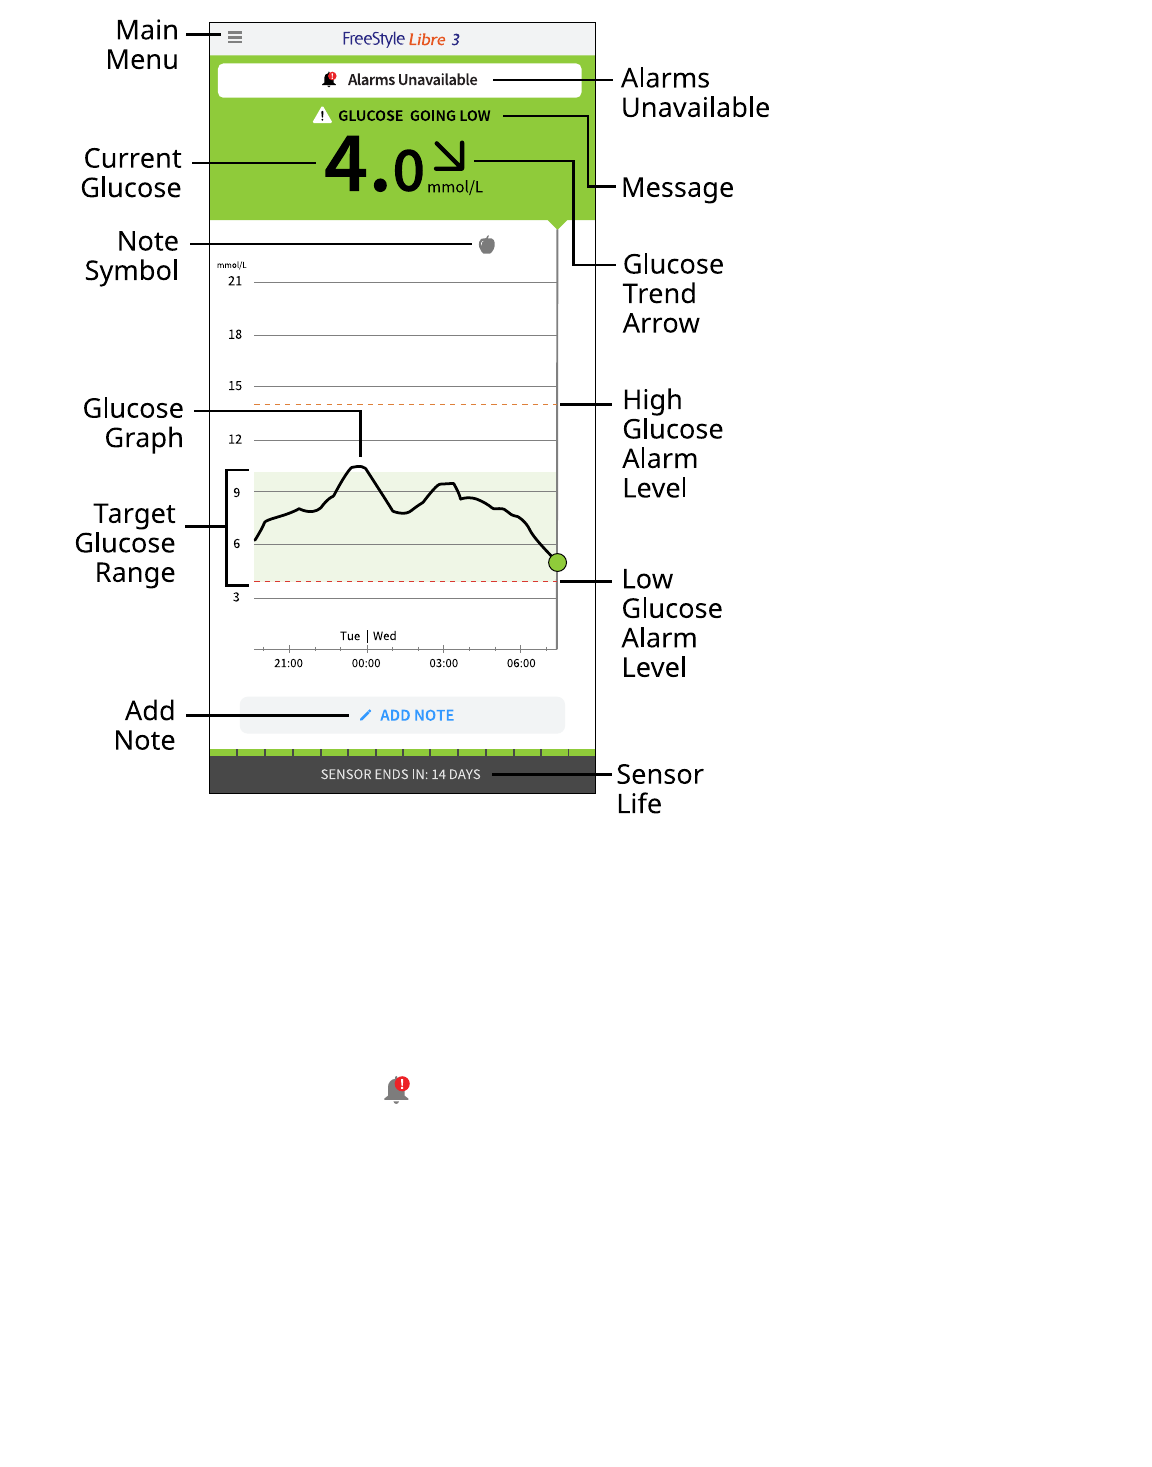
Main Menu – Tap to access the Home Screen, Alarms, Logbook, other history
options and Connected Apps. You can also access Settings, Help and other
information
Message – You may be able to tap the message for more information
Alarms Unavailable – The
displays if alarms you have turned on are not
available
Current Glucose – Your most recent glucose value
Glucose Trend Arrow – Direction your glucose is going
Glucose Graph – Graph of your current and stored glucose readings
Target Glucose Range – The graph shows your target glucose range. This is not
related to glucose alarm levels
ART46090-003_rev-A 08-Apr-22 12:30pm

High Glucose Alarm Level – The graph shows your High Glucose Alarm level. This
displays only when you have turned the alarm ON
Low Glucose Alarm Level – The graph shows your Low Glucose Alarm level. This
displays only when you have turned the alarm ON
Sensor Life – The number of days of life remaining on the Sensor
Add Note – Tap to add notes to the glucose reading
Note Symbol – Tap to review notes you’ve entered
Reporting Software
Software can be used to create reports based on glucose readings from FreeStyle
Libre 3 Sensors. Go to
www.FreeStyleLibre.com and follow onscreen instructions to
access the compatible software. You are responsible for keeping your computer
secure and up to date; for example, by using anti-virus software and installing
system updates.
Sensor Kit
ART46090-003_rev-A 08-Apr-22 12:30pm
A FreeStyle Libre 3 Sensor Kit includes:
Sensor Applicator
Product insert
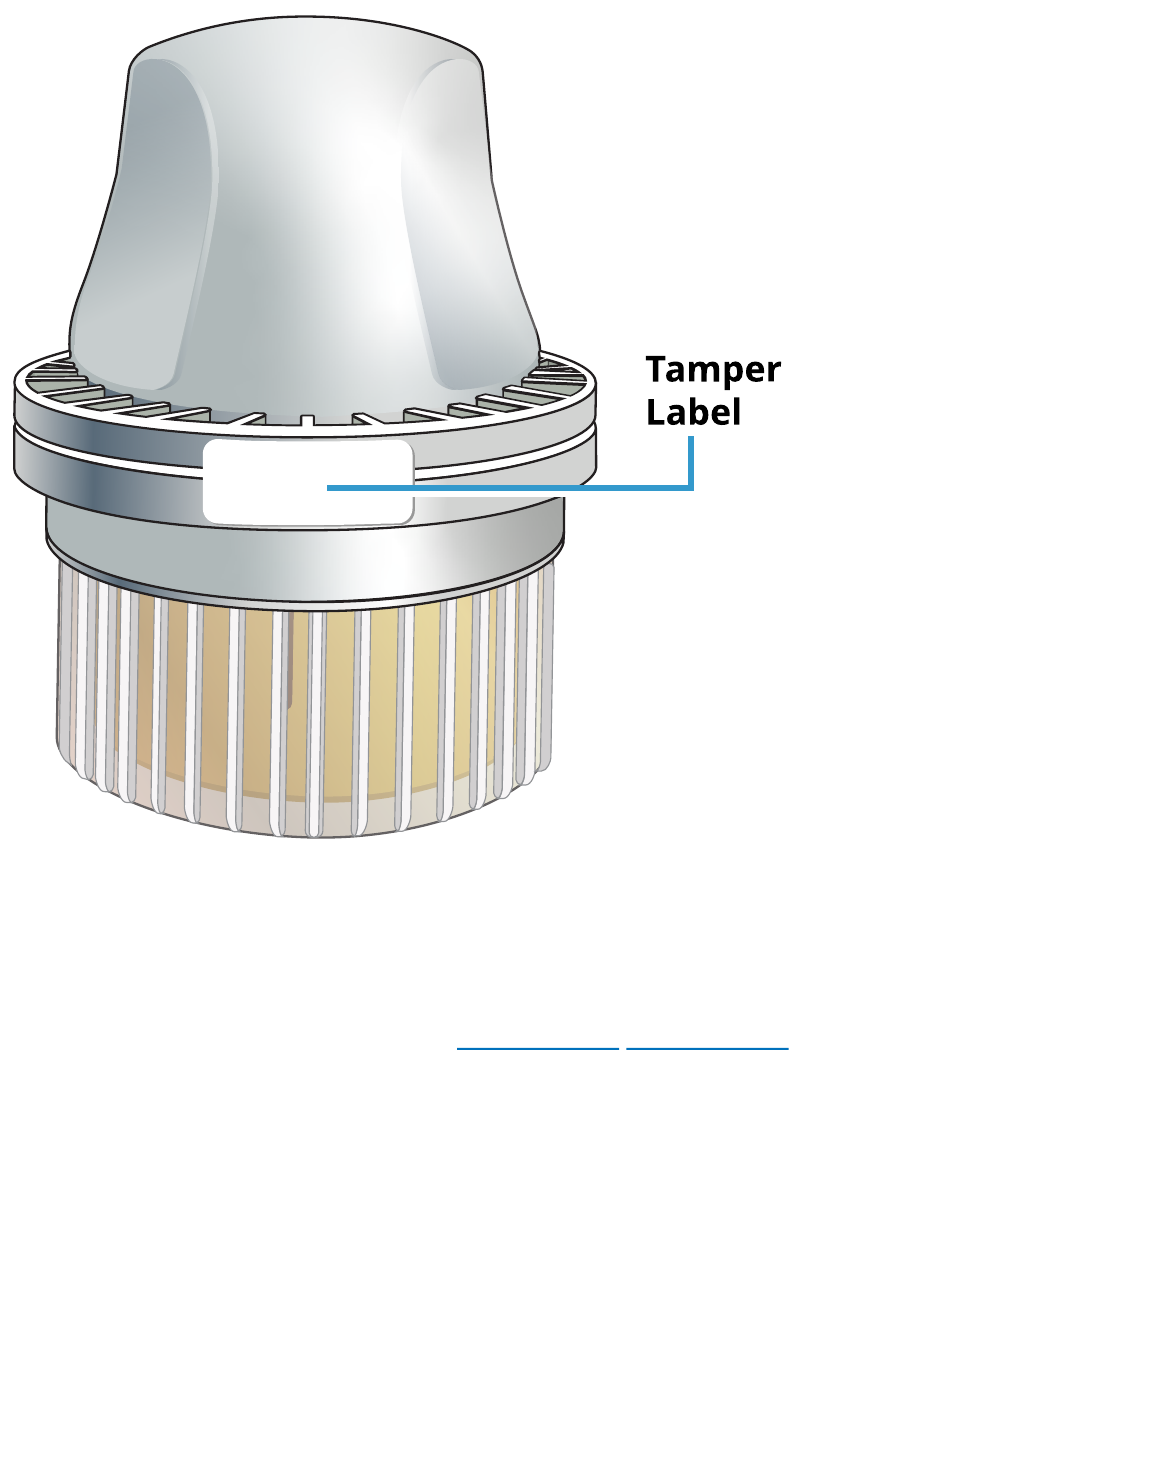
When opening your kit, check that the contents are undamaged and that you have
all parts listed. If any parts are missing or damaged, or if the tamper label
indicates the Sensor Applicator has already been opened, contact Customer
Service. The Sensor (only visible after applied) measures and stores glucose
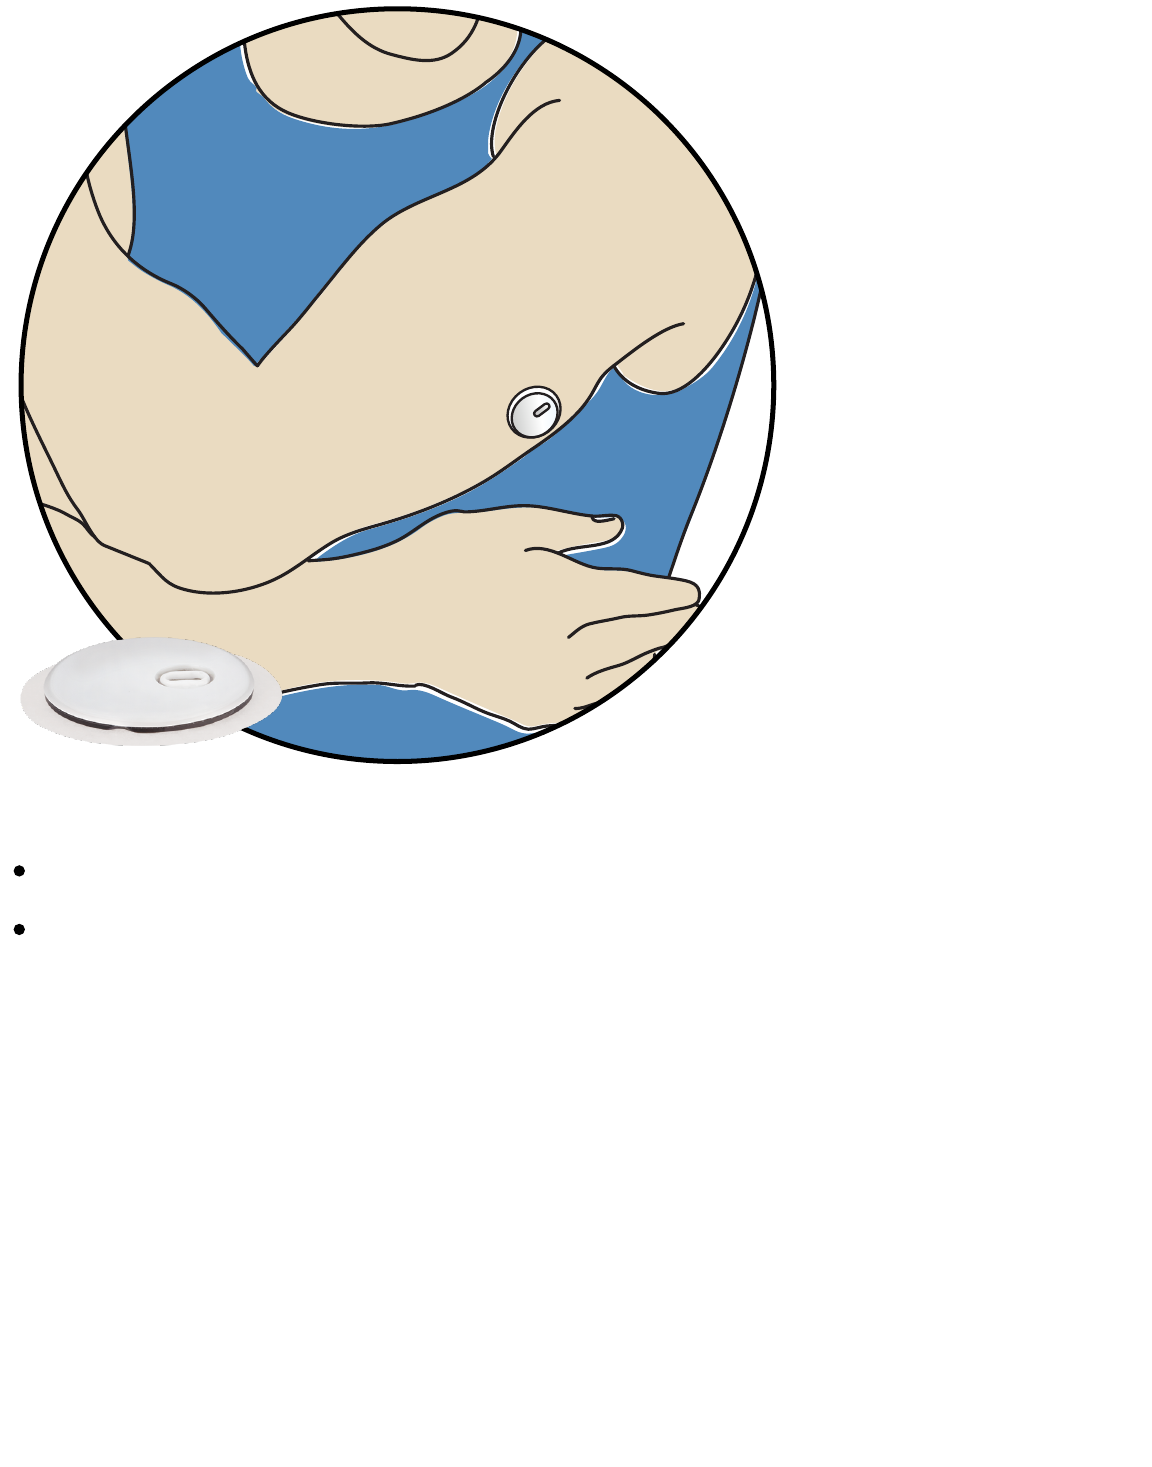
readings when worn on your body. By following the instructions, you use the
Sensor Applicator to apply the Sensor on the back of your upper arm. The Sensor
has a small, flexible tip that is inserted just under the skin.
Sensor Applicator. Applies the Sensor to your body.
ART46090-003_rev-A 08-Apr-22 12:30pm
App Setup
The FreeStyle Libre 3 app is only compatible with certain mobile devices and
operating systems. Please check
www.FreeStyleLibre.com for more information
about device compatibility before upgrading your phone or its operating system.
Before using the App for the first time, you must complete the setup.
1. Check that your phone is connected to a network (Wi-Fi or mobile). You can then
install the FreeStyle Libre 3 app from the Google Play Store. Tap the App icon to
open the App.
Note: You only need to be connected to a network for setup, using LibreView
and sharing with other apps. You do not need to be connected to check your
glucose, receive alarms, add notes or review your history in the App.
ART46090-003_rev-A 08-Apr-22 12:30pm
2. Swipe left to view some helpful tips or tap GET STARTED NOW at any point. If
you already have a LibreView account, tap Sign In.
3. Confirm your country and tap NEXT.
4. You have the option to create a LibreView account so that you can:
View your data and reports online at www.LibreView.com
Share your data with your care team through Connected Apps
Connect your Sensor to your account, allowing you to transfer it to a di"erent
phone (for instance, if you lose your phone)
Follow onscreen instructions to review legal information.
5. Confirm your glucose unit of measure and tap NEXT.
6. Select how you count carbohydrates (in grams or portions) and tap NEXT. The
carbohydrate unit will be used in any food notes you enter in the App.
7. The App now displays some useful information. Tap GET STARTED NOW then
tap NEXT to review each screen.
8. Accept required notification permissions.
9. Apply a new Sensor and then tap NEXT. Go to Starting Your Sensor.
Note: If you need help applying your Sensor, tap HOW TO APPLY A SENSOR or
go to
Applying Your Sensor.
Applying Your Sensor
CAUTION:
Intense exercise may cause your Sensor to loosen due to sweat or movement of
the Sensor. If your Sensor comes loose, you may get no readings or unreliable
readings, which may not match how you feel. Follow the instructions to select an
appropriate application site.
Note: Tap Help in the Main Menu to access an in-app tutorial on applying a Sensor.
1. Apply the Sensor only on the back of your upper arm. Avoid areas with scars,
moles, stretch marks or lumps. Select an area of skin that generally stays flat
ART46090-003_rev-A 08-Apr-22 12:30pm
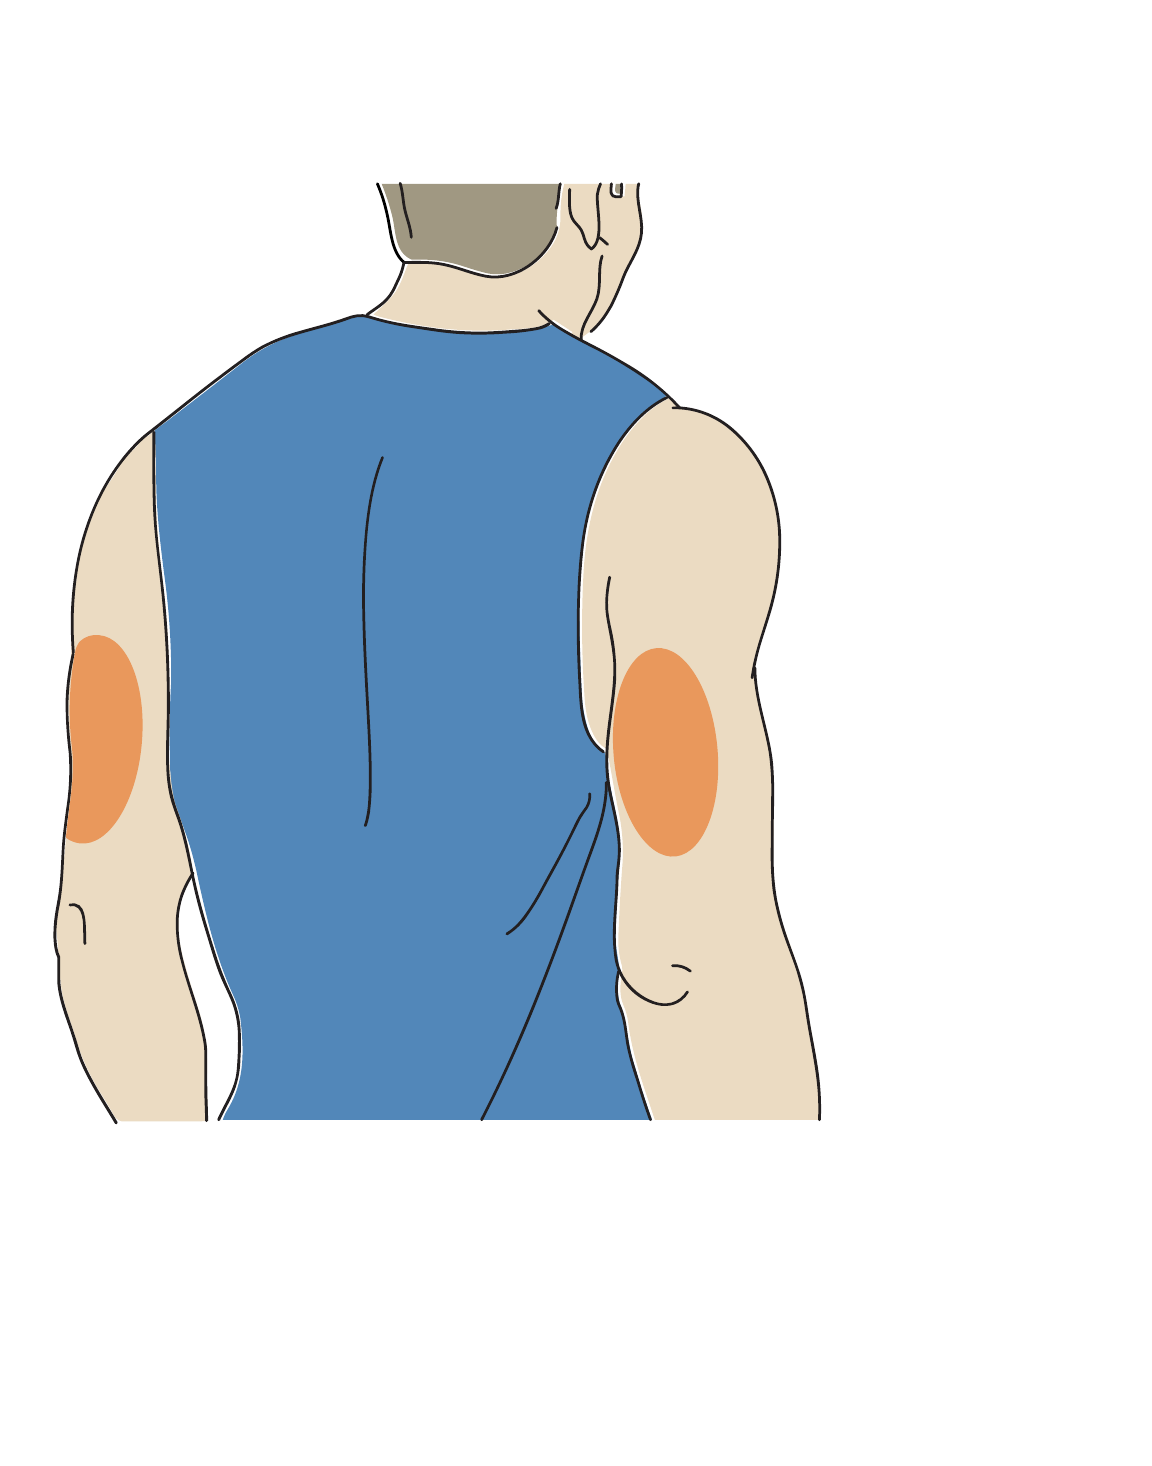
during your normal daily activities (no bending or folding). Choose a site that is
at least 2.5 cm (1 inch) away from an insulin injection site. To prevent discomfort
or skin irritation, you should select a di"erent site other than the one most
recently used.
2. Wash application site using a plain soap, dry, and then clean with an alcohol
wipe. This will help remove any oily residue that may prevent the Sensor from
sticking properly. Allow site to air-dry before proceeding.
Note: The area MUST be clean and dry, or the Sensor may not stick to the site.
ART46090-003_rev-A 08-Apr-22 12:30pm

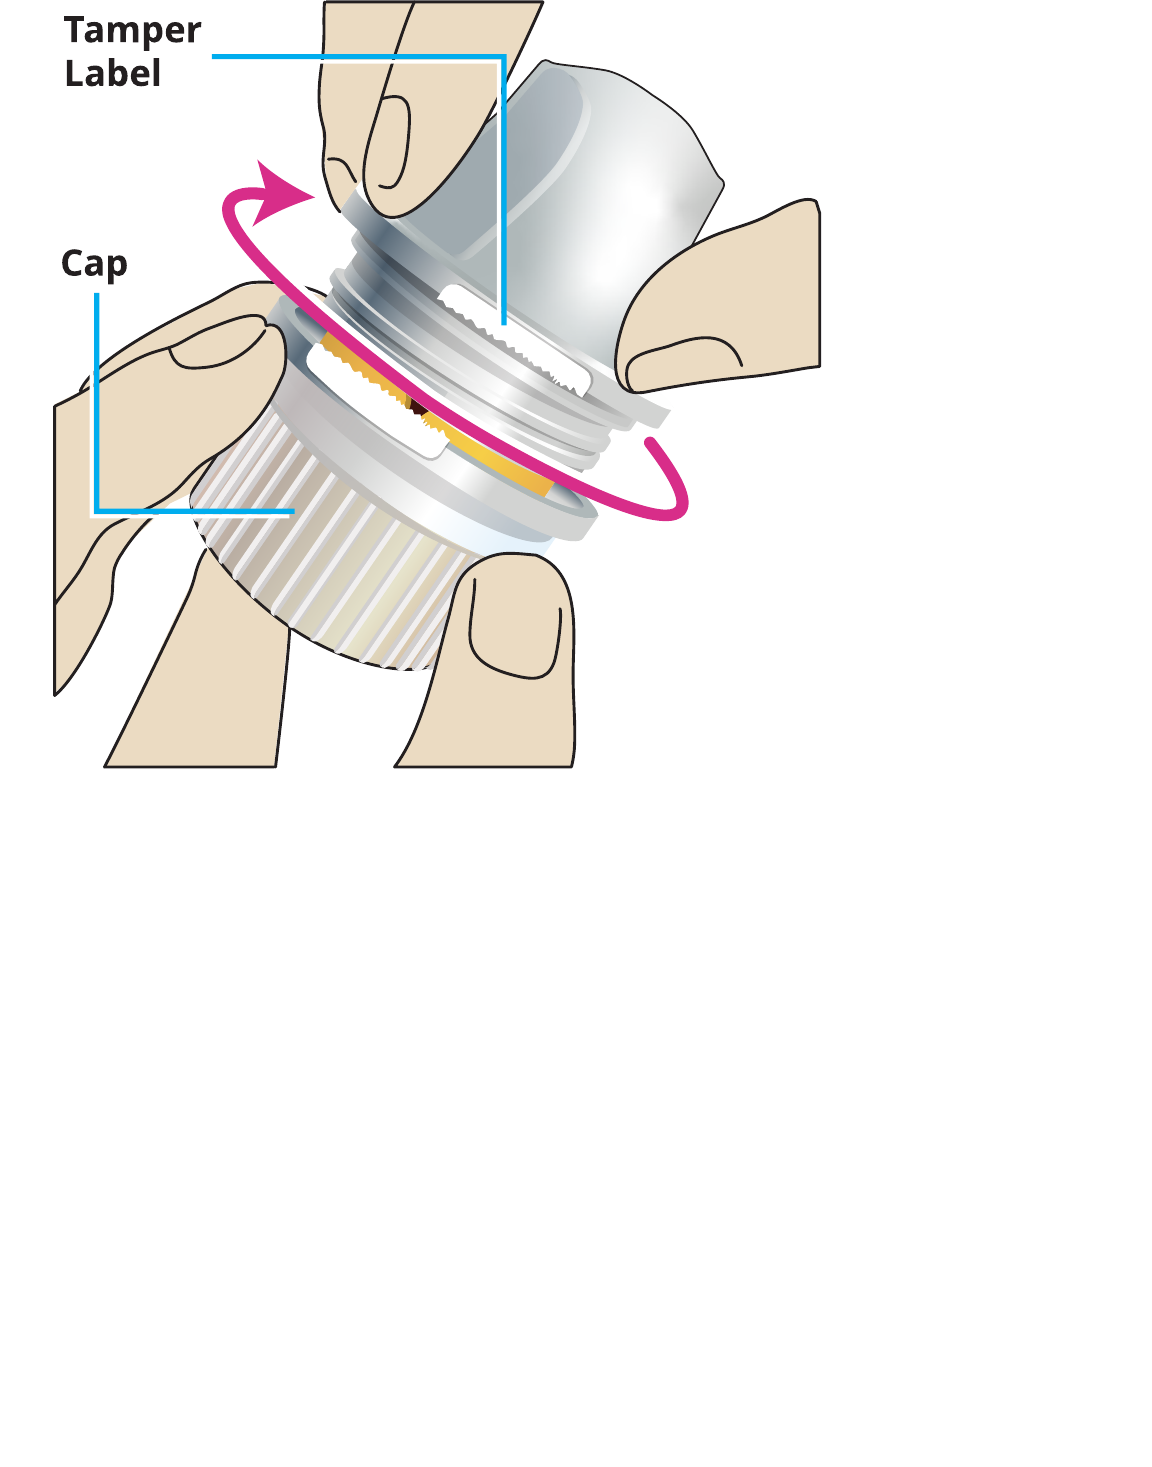
3. Unscrew the cap from the Sensor Applicator and set the cap aside.
CAUTION:
Do NOT use if damaged or if tamper label indicates Sensor Applicator has
already been opened.
Do NOT put cap back on as it may damage the Sensor.
Do NOT touch inside Sensor Applicator as it contains a needle.
Do NOT use if past expiry date.
ART46090-003_rev-A 08-Apr-22 12:30pm
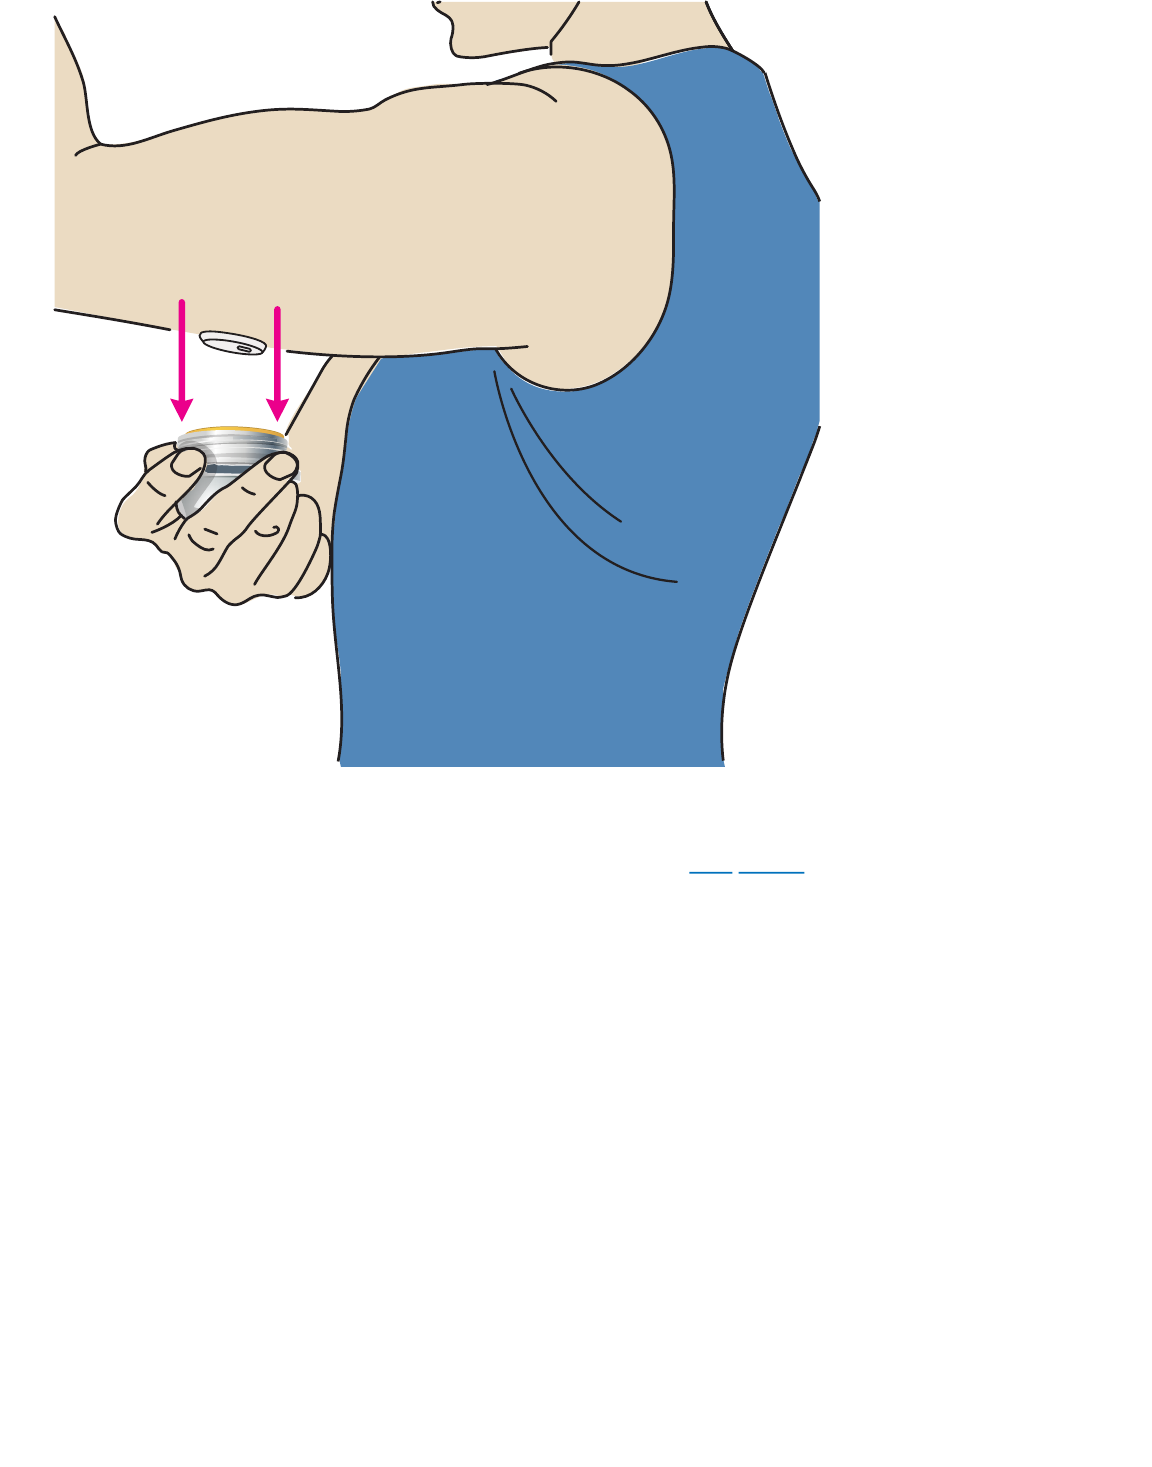
4. Place the Sensor Applicator over the prepared site and push down firmly to
apply the Sensor to your body.
CAUTION: Do NOT push down on Sensor Applicator until placed over prepared
site to prevent unintended results or injury.
ART46090-003_rev-A 08-Apr-22 12:30pm
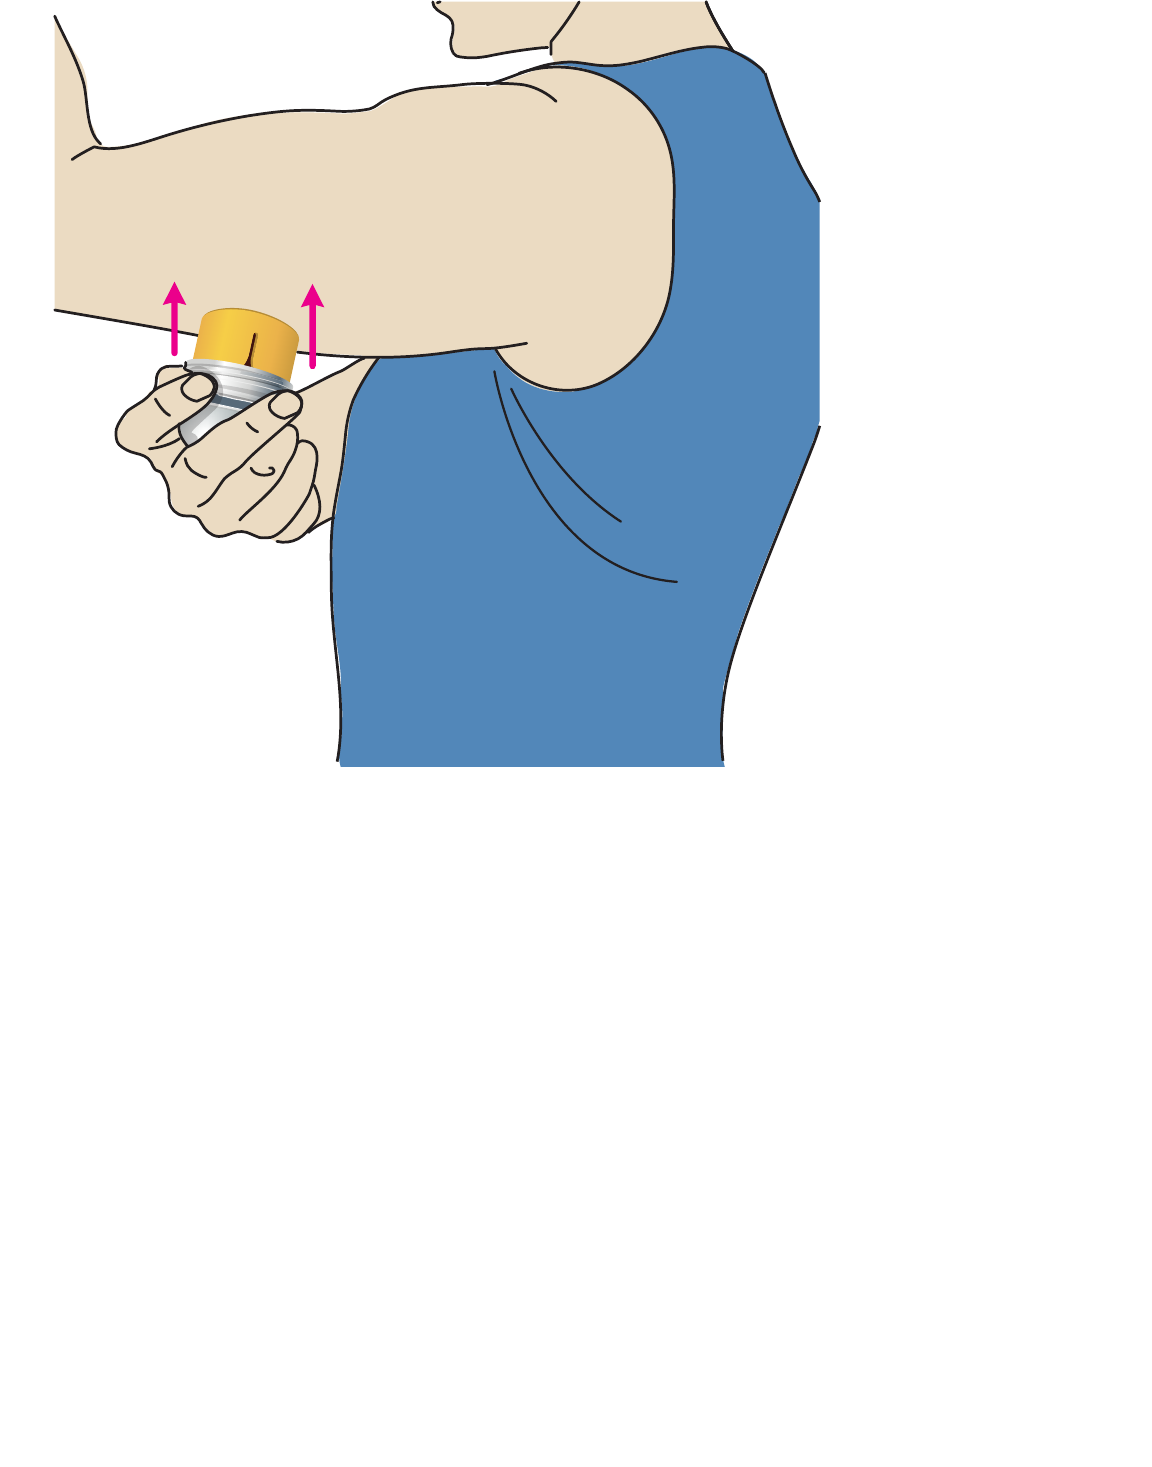
5. Gently pull the Sensor Applicator away from your body. The Sensor should now
be attached to your skin.
Note: Applying the Sensor may cause bruising or bleeding. If there is bleeding
that does not stop, remove the Sensor, and apply a new one at a di"erent site.
ART46090-003_rev-A 08-Apr-22 12:30pm
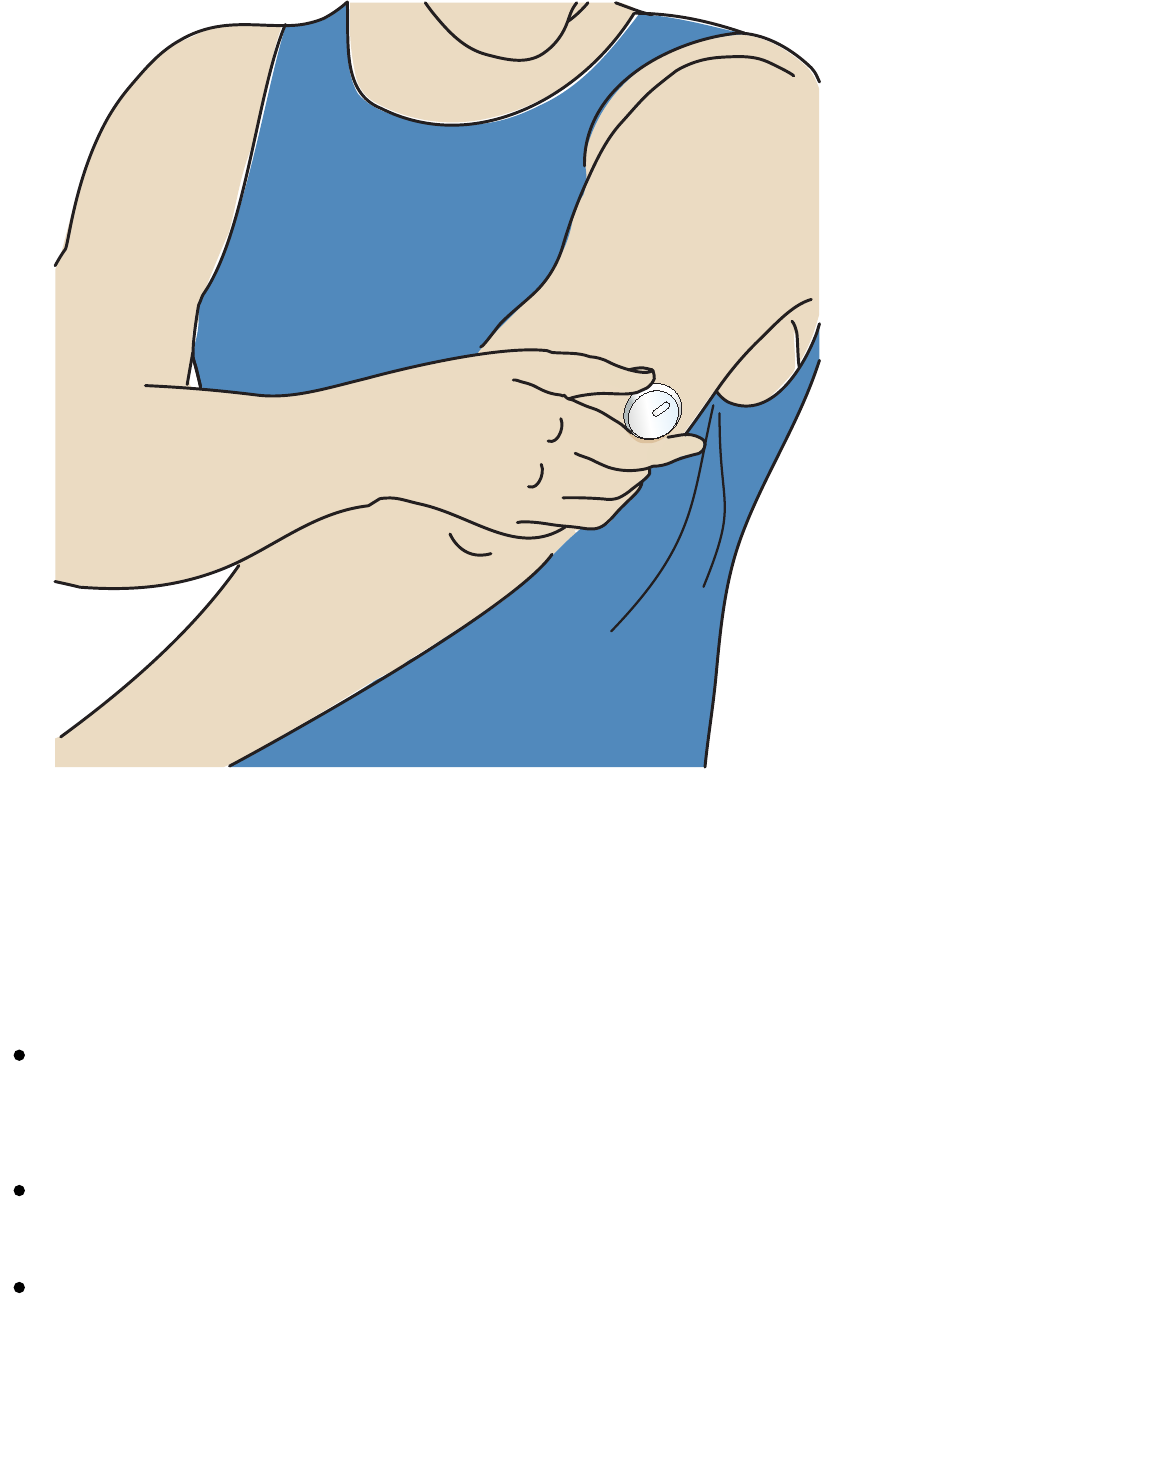
Starting Your Sensor
Start a new Sensor by scanning it with your phone.
IMPORTANT:
The App requires that your phone has the correct date and time for recording
your health information. Your phone’s date and time should be set to update
automatically. You can check this in your phone settings.
When using the App, you should keep your phone well charged and be sure you
have access to a blood glucose monitoring system.
The NFC (Near Field Communication) antenna is located on the back side of
most Android phones. Scan your Sensor by touching the Sensor with the BACK
of your phone. Move your phone around slowly if needed. Proximity, orientation
and other factors can a"ect NFC performance. For example, a bulky or metallic
case can interfere with the NFC signal. Keep in mind that the ease of scanning a
ART46090-003_rev-A 08-Apr-22 12:30pm
Sensor may vary between phone models.
For more information on device compatibility, access the Mobile Device & OS
Compatibility guide at
www.FreeStyleLibre.com
1. From the App Home Screen, scan the Sensor with the BACK of your phone to
start it. You will receive a tone and vibration after you have successfully started
the Sensor. If your phone’s volume is turned o", you will not hear the tone.
Note: Each phone model is di"erent. Touch the Sensor with your phone or
move your phone around slowly until you learn how to scan.
2. The Sensor can be used to check your glucose after 60 minutes. While the
Sensor is starting up, you can navigate away from the App. If notifications are
enabled, you will see a notification when the Sensor is ready.
Note: If you have an active Sensor and want to start a new Sensor, go to the
Menu and tap Start New Sensor
.
Note:
If you need help, tap HOW TO SCAN A SENSOR to view an in-app tutorial. You
can also access this later by going to the Main Menu and then tapping Help.
If your Sensor is not successfully scanned, you may receive a Scan Error
ART46090-003_rev-A 08-Apr-22 12:30pm
message. Follow the instructions in the message.
See Troubleshooting for additional error messages.
Checking Your Glucose
1. Open the App.
2. If you have an active Sensor, the Home Screen displays your glucose reading. It
includes your Current Glucose, a Glucose Trend Arrow indicating which way
your glucose is going, and a graph of your current and stored glucose readings.
Current Glucose – Your most recent glucose value
ART46090-003_rev-A 08-Apr-22 12:30pm
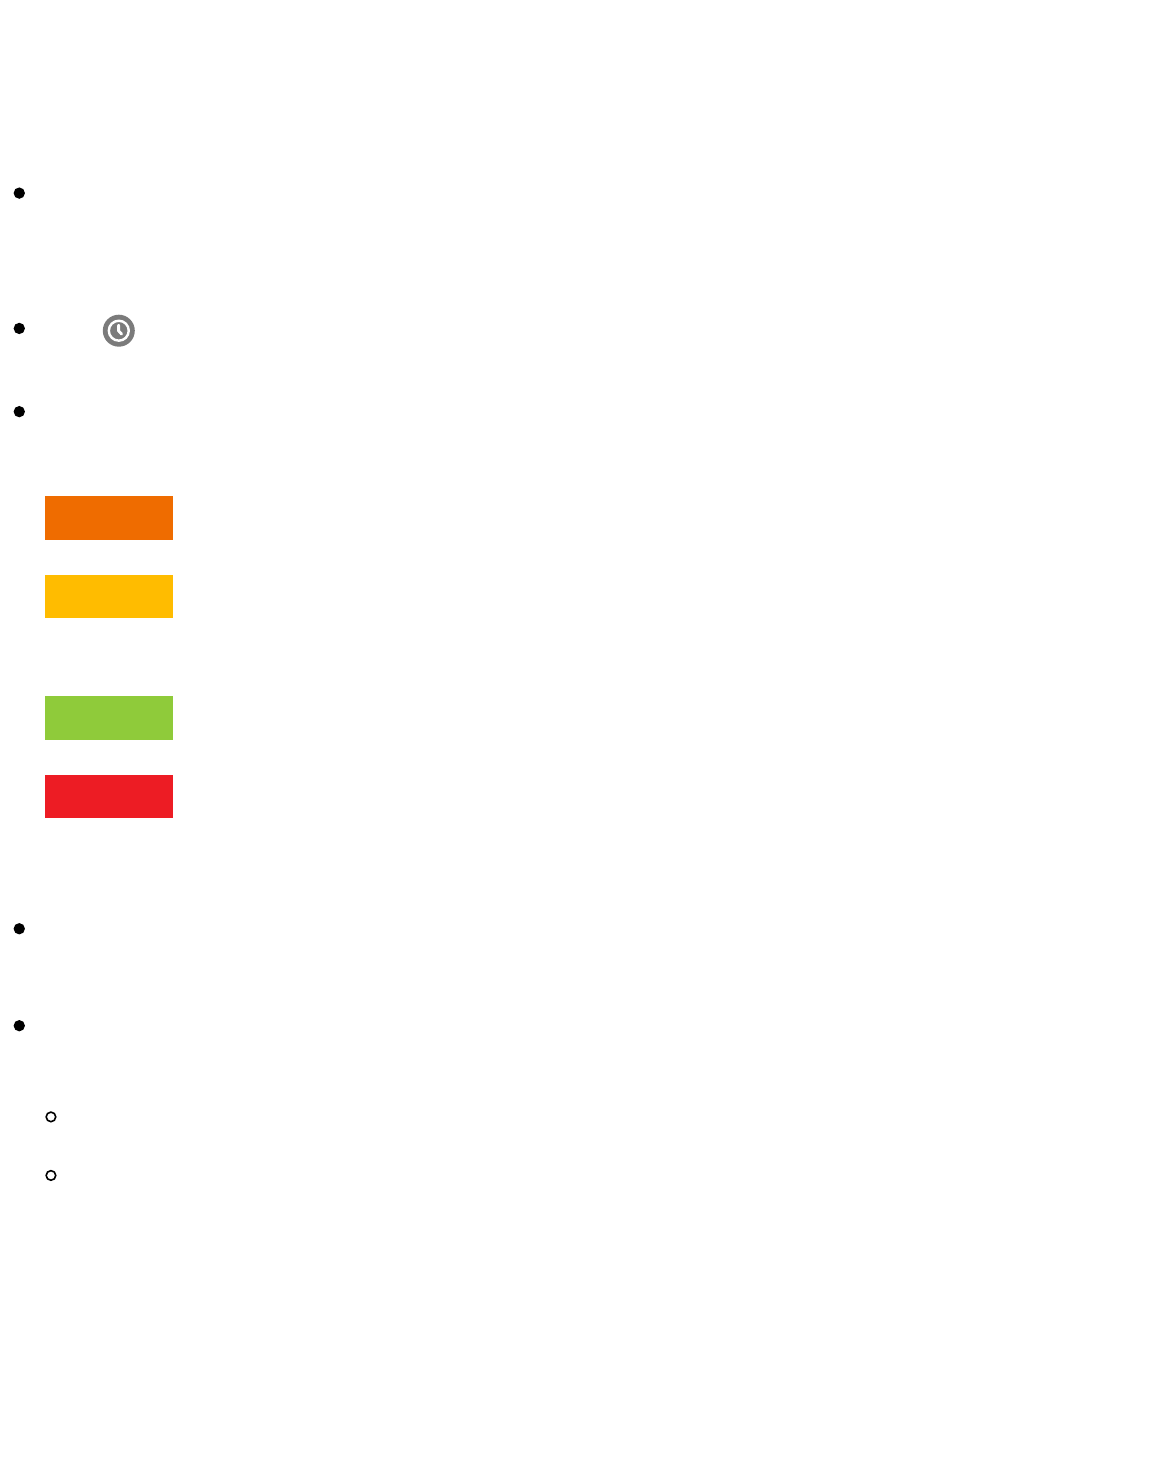
Orange -
Yellow -
Green -
Red -
Glucose Trend Arrow – Direction your glucose is going
Glucose Graph – Graph of your current and stored glucose readings
Note:
The graph displays glucose readings above 21!mmol/L as 21!mmol/L. For
consecutive readings above 21!mmol/L, a line is displayed at 21!mmol/L. The
Current Glucose number can be as high as 27.8!mmol/L.
The symbol may appear, indicating the phone's time was changed.
Your current glucose value determines the background colour on the Home
Screen:
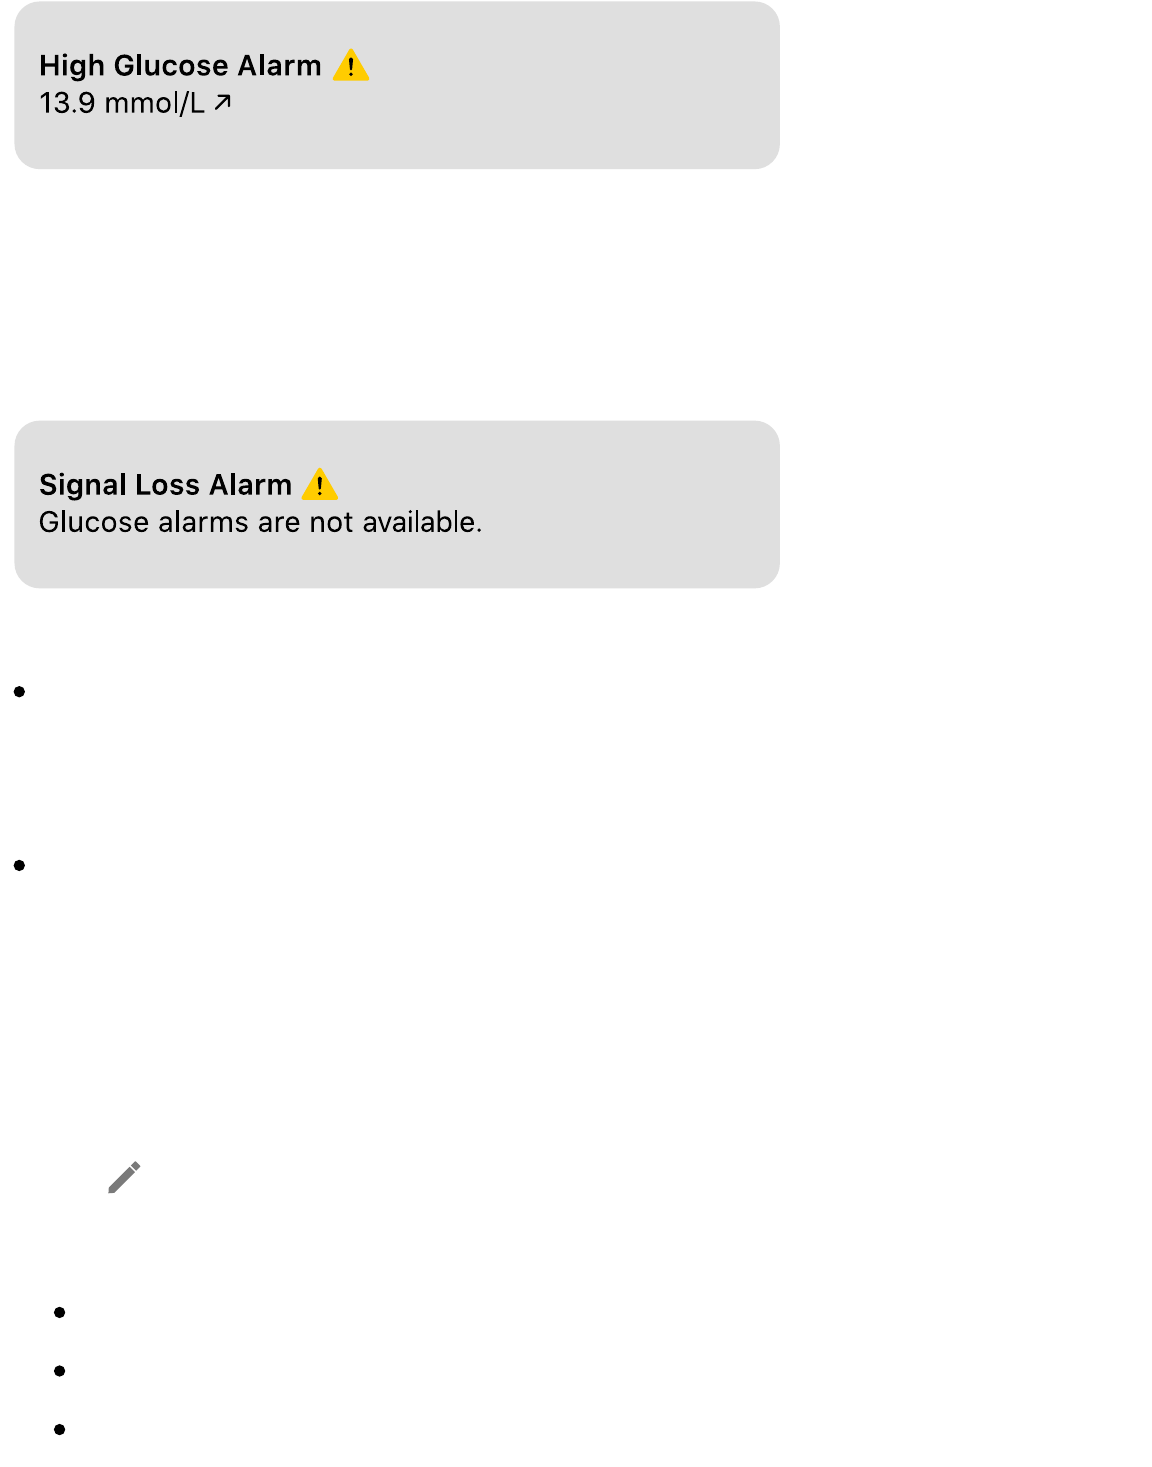
High glucose (above 13.9!mmol/L)
Between the Target Glucose Range and high or low glucose
level
Within the Target Glucose Range
Low glucose (below 3.9!mmol/L)
If you are not receiving glucose readings you will not receive Low or High
Glucose Alarms.
In order for the FreeStyle Libre 3 app to share data with other connected apps,
please do the following:
Enable Wi-Fi or mobile service.
Disable Low Data mode.
Understanding Your Glucose Readings
Glucose Trend Arrow
ART46090-003_rev-A 08-Apr-22 12:30pm
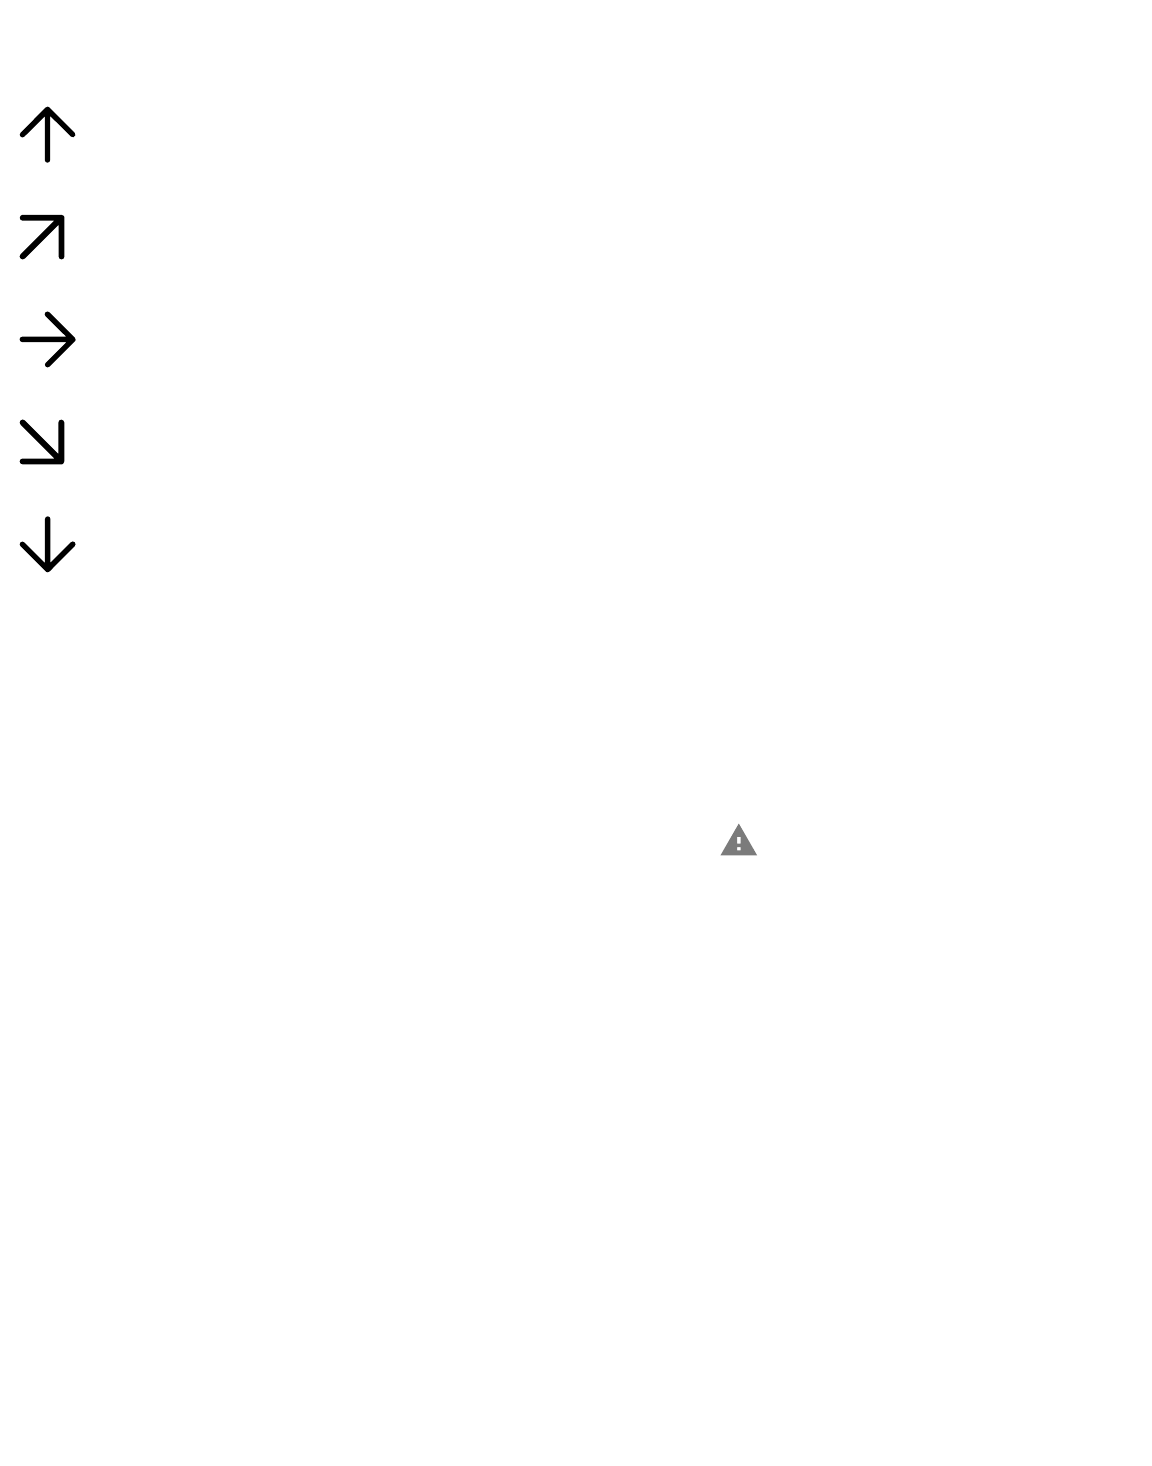
The Glucose Trend Arrow gives you an indication of the direction your glucose is
going.
Glucose is rising quickly (more than
0.1!mmol/L per minute)
Glucose is rising (between 0.06 and
0.1!mmol/L per minute)
Glucose is changing slowly (less
than 0.06!mmol/L per minute)
Glucose is falling (between 0.06 and
0.1!mmol/L per minute)
Glucose is falling quickly (more than
0.1!mmol/L per minute)
Messages
Below are messages you may see with your glucose readings.
LO | HI: If LO appears, your reading is lower than 2.2!mmol/L. If HI appears, your
reading is higher than 27.8!mmol/L. You can tap the symbol for more
information. Check your blood glucose on your finger with a test strip. If you get a
second LO or HI result, contact your healthcare professional immediately.
ART46090-003_rev-A 08-Apr-22 12:30pm

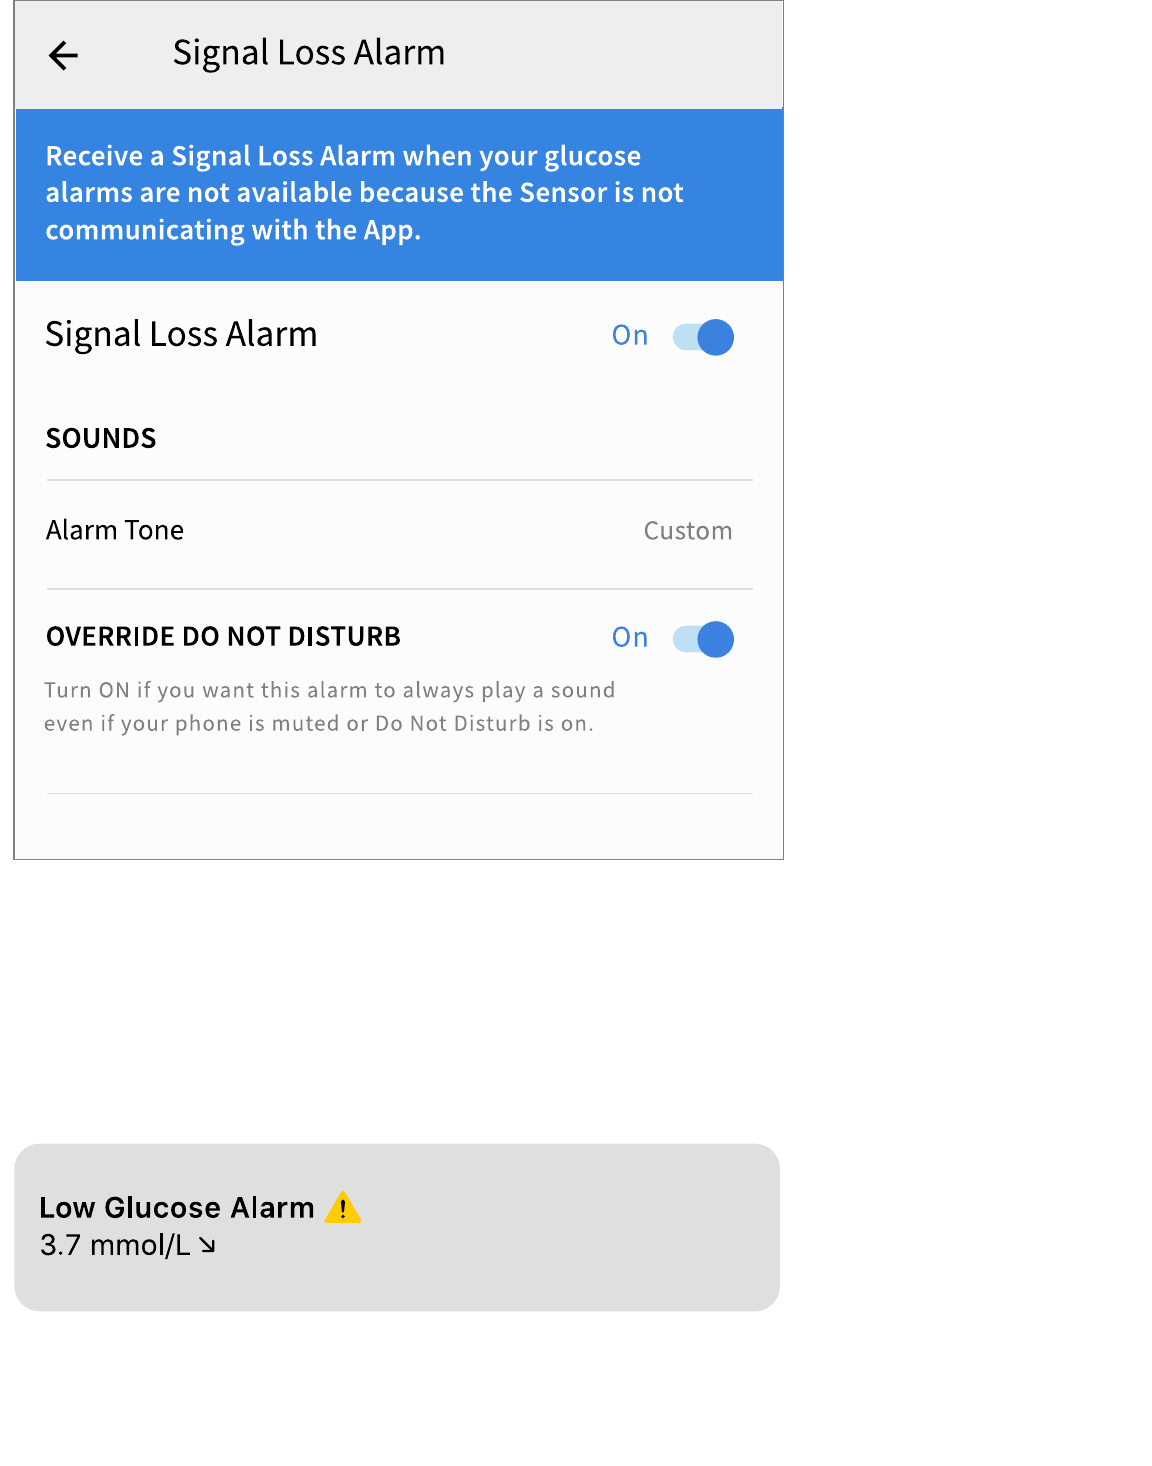
Low Glucose | High Glucose: If your glucose is lower than 3.9!mmol/L or higher
than 13.9!mmol/L, you will see a message on the screen. You can tap the
symbol for more information and set a reminder to check your glucose.
Glucose Going Low | Glucose Going High: If your glucose is projected to be lower
than 3.9!mmol/L or higher than 13.9!mmol/L within 15 minutes, you will see a
message on the screen. The background colour corresponds to your current
ART46090-003_rev-A 08-Apr-22 12:30pm
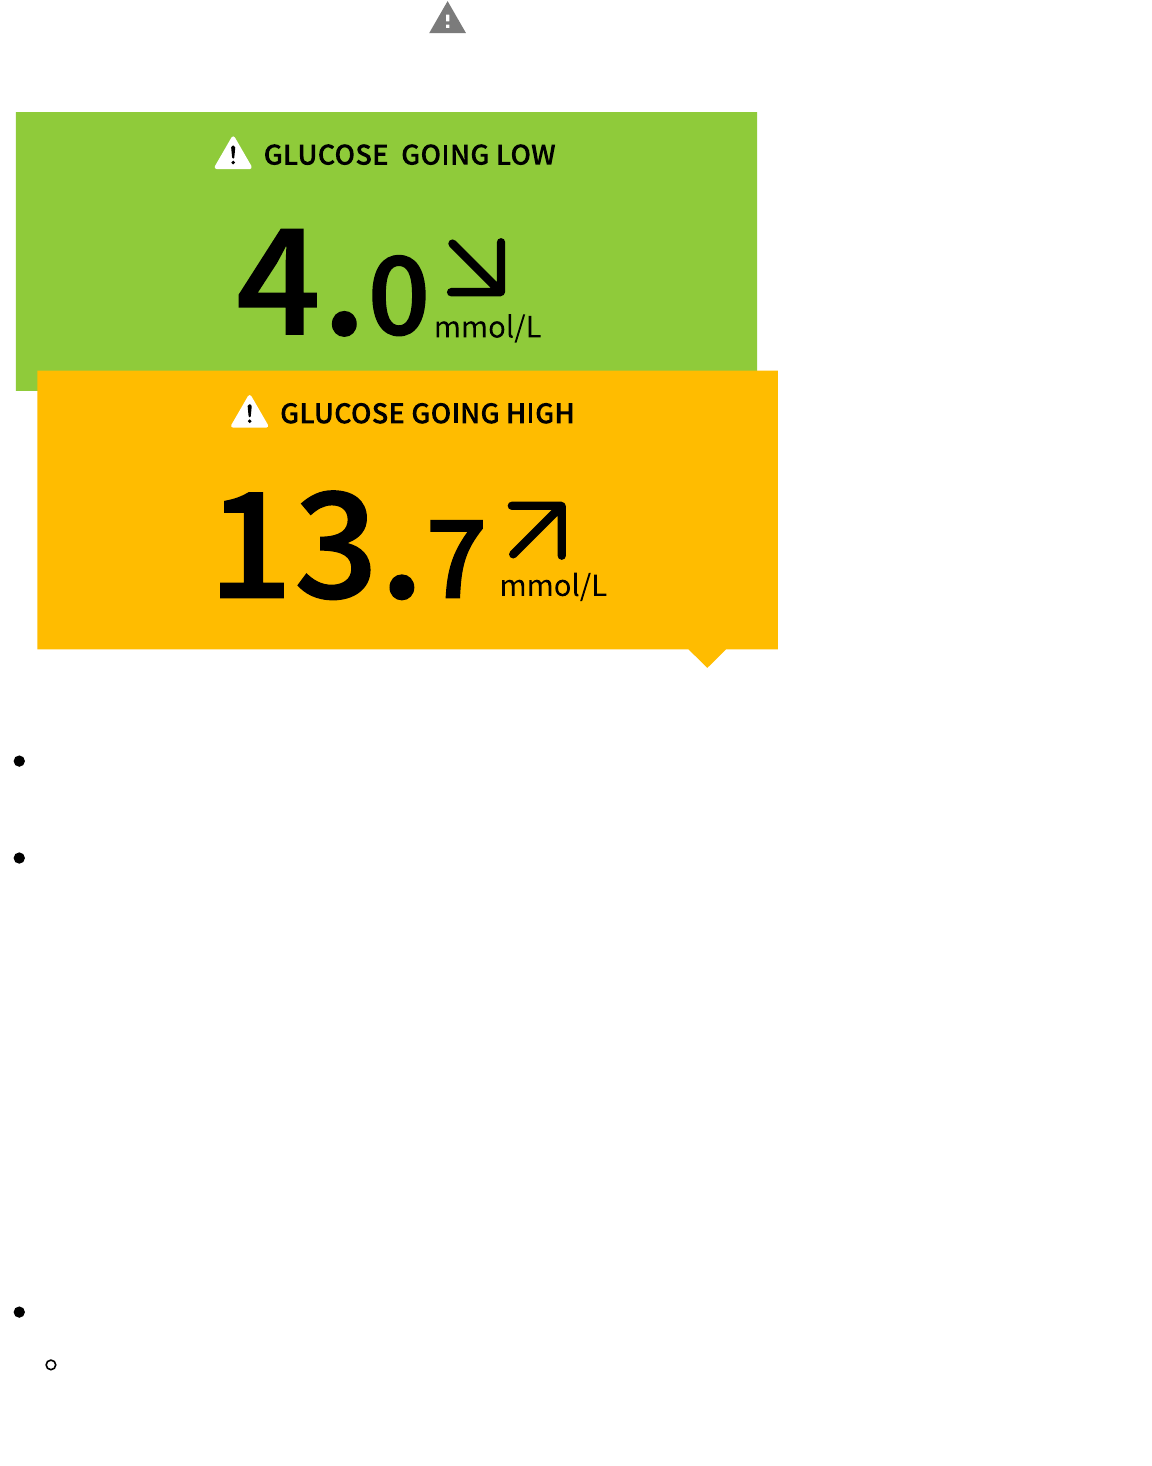
glucose value. You can tap the symbol for more information and set a reminder
to check your glucose.
Note:
If you are not sure about a message or reading, contact your healthcare
professional for information.
Messages you receive with your glucose readings are not related to your
glucose alarm settings.
Alarms
This section explains how to set and use alarms. Please read all the information in
this section so that you may ensure that you receive glucose alarms when they are
enabled.
CAUTION:
For you to receive alarms, make sure to:
Turn alarms ON and ensure that your phone is within 10 metres (33!ft) of you
at all times. The transmission range is 10 metres (33!ft) unobstructed. If you
are out of range, you may not receive alarms. If you want to receive the App's
ART46090-003_rev-A 08-Apr-22 12:30pm
optional alarms, make sure these are turned on.
Do not force close the App. The App must be running in the background to
receive alarms. If you force close the App you will not receive alarms. Re-open
the App to ensure you will receive alarms.
If you restart your phone, open your App to make sure it’s working properly.
The App will ask for phone permissions which are needed to receive alarms.
Allow these permissions when requested.
Check to make sure that you have the correct phone settings and permissions
enabled. If your phone is not configured properly, you will not receive alarms.
Your phone should be configured as follows:
In the phone settings
Keep Bluetooth ON
Keep phone Media volume ON
Keep Battery Saver mode OFF
In the phone settings for the App
Keep Show Notifications ON
Keep Do Not Disturb access permission ON
Keep Battery Optimisation OFF
Do NOT modify channel notification settings for the App
Keep Lock Screen notifications ON
Keep Pop-up notifications ON
You may need to add the FreeStyle Libre 3 app to the list of apps that will
not be restricted or put to sleep.
If you adjust the phone Media volume to silent or use the phone do not
disturb setting, turn ‘Override Do Not Disturb’ setting in the App ON for
Low Glucose, High Glucose and Signal Loss Alarms to ensure you receive
audible alarms.
Note: You must accept the App’s permission request for Do Not Disturb
ART46090-003_rev-A 08-Apr-22 12:30pm
access to use the Override Do Not Disturb feature. You can also enable the Do
Not Disturb access setting directly from the App's notification settings.
You should disconnect headphones or speakers from your phone when you
are not using them as you may not hear audio for alarms. If using
headphones, keep them in your ears.
If you are using peripheral devices connected to your phone, such as wireless
headphones or a smartwatch, you may receive alarms on only one device or
peripheral, not all.
Keep your phone well charged and turned on.
Disable your phone’s automatic operating system updates. After an operating
system update, open your App and check your device settings to make sure
it’s working properly.
Do not use the Android Digital Wellbeing app. It may impact your ability to
receive alarms.
Note: To receive alarms, make sure notifications for the App are enabled. If you
want to receive a sound/vibration with your alarm, ensure that sound/vibration
on your phone is turned on, sound is set at a level you can hear and your
phone’s Do Not Disturb feature is turned o". If Do Not Disturb is on, you will
only see your alarm on the screen.
IMPORTANT:
The Low and High Glucose Alarms should not be used exclusively to detect low
or high glucose conditions. The glucose alarms should always be used along
with your current glucose, glucose trend arrow and glucose graph.
Low and High Glucose Alarm levels are di"erent from your Target Glucose
Range values. Low and High Glucose Alarms tell you when your glucose has
passed the level you set in the alarm. Your Target Glucose Range is displayed on
glucose graphs in the App and used to calculate your Time In Ranges.
Make sure your phone is near you. The Sensor itself will not issue alarms.
If the Sensor is not communicating with the App, you will not receive
ART46090-003_rev-A 08-Apr-22 12:30pm
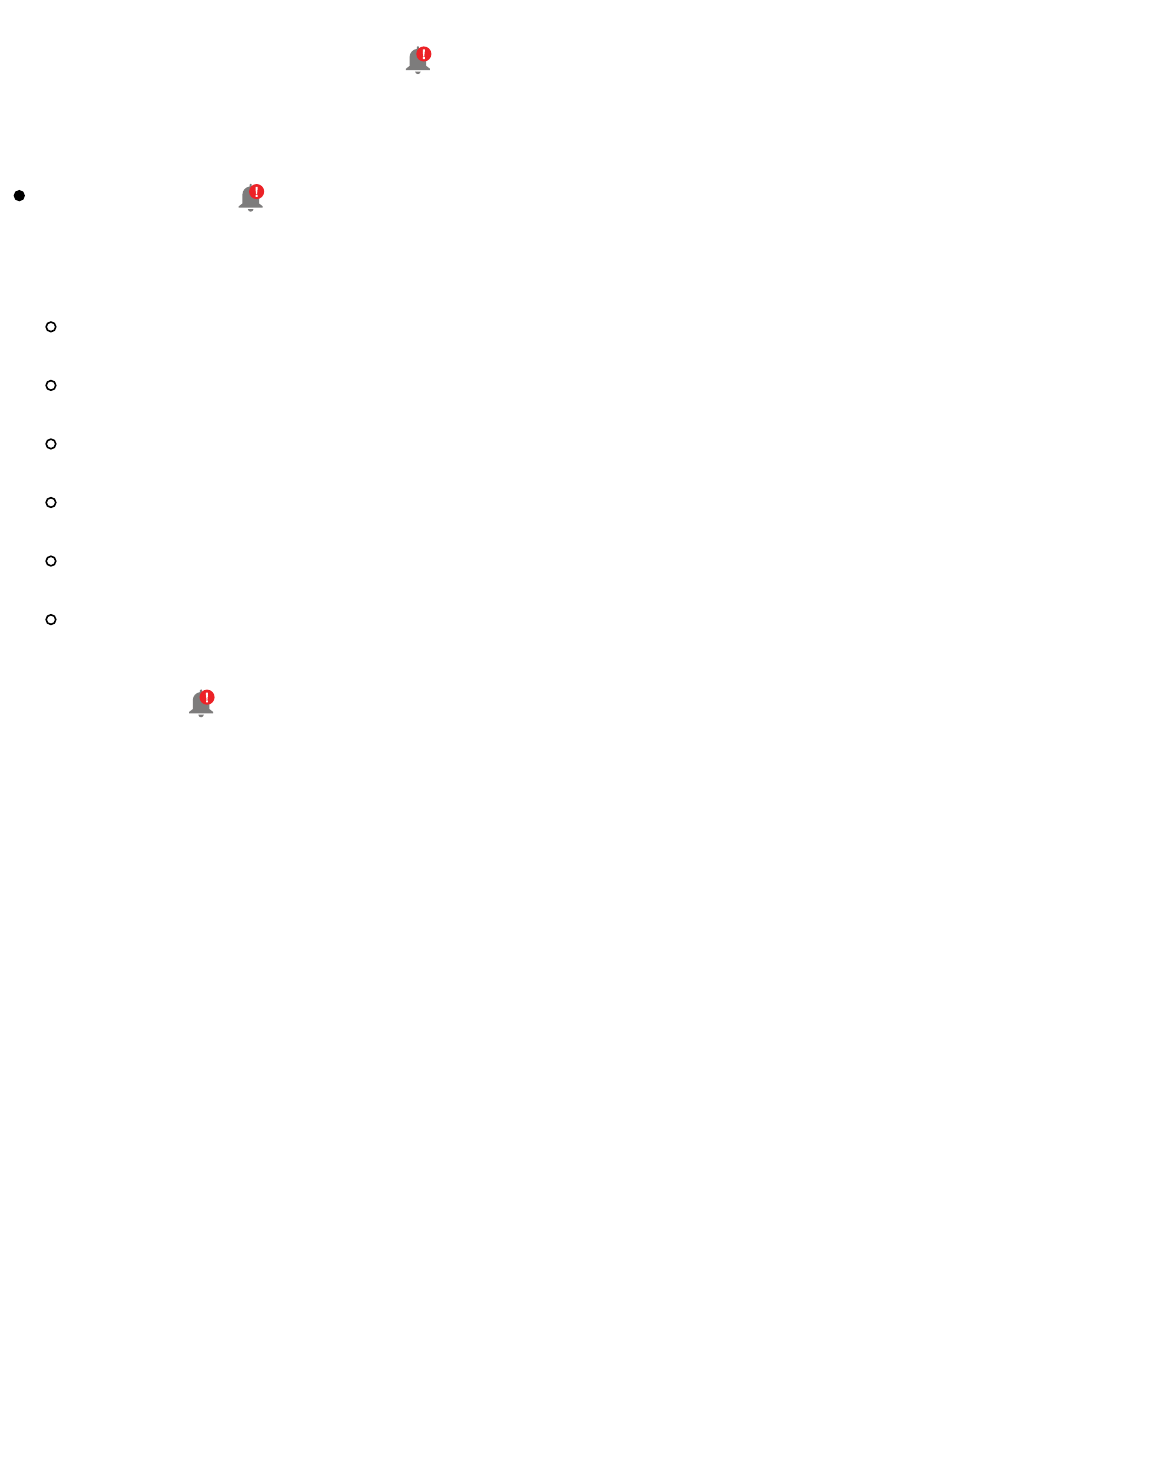
glucose alarms, and you may miss detecting low glucose or high glucose
episodes. You will see the
symbol on the screen when the Sensor is not
communicating with the App. If the Signal Loss Alarm is on, you will be notified if
your Sensor has not communicated with the App for 20 minutes.
If you see the symbol, this means you are not getting glucose alarms because
the Sensor is not communicating with the App, or the phone settings are
incorrect. Confirm your settings are as follows:
Bluetooth is ON
Lock Screen notifications are ON
Channel notifications or Pop-up notifications are ON
Battery Optimisation is OFF
Do Not Disturb Access permission is ON
Phone Media volume is ON
Touch the
symbol for more information.
Setting Alarms
To set or turn on alarms, go to the Main Menu and tap Alarms. Select the alarm
you want to turn on and set.
Low Glucose Alarm
1. The Low Glucose Alarm is o" by default. Tap the slider to turn the alarm on.
2. If the alarm is on, you will be notified when your glucose falls below the alarm
level, which is initially set to 3.9!mmol/L. Tap to change this value between
3.3!mmol/L and 5.6!mmol/L. Tap SAVE.
3. Choose the sound for this alarm. Volume and vibration will match your phone
settings. Tap SAVE.
4. To override your phone’s sound and vibration settings, select whether to turn
on Override Do Not Disturb for this alarm. Turn ON if you want the alarm to
always play a sound and appear on the lock screen, even if your phone’s Media
ART46090-003_rev-A 08-Apr-22 12:30pm
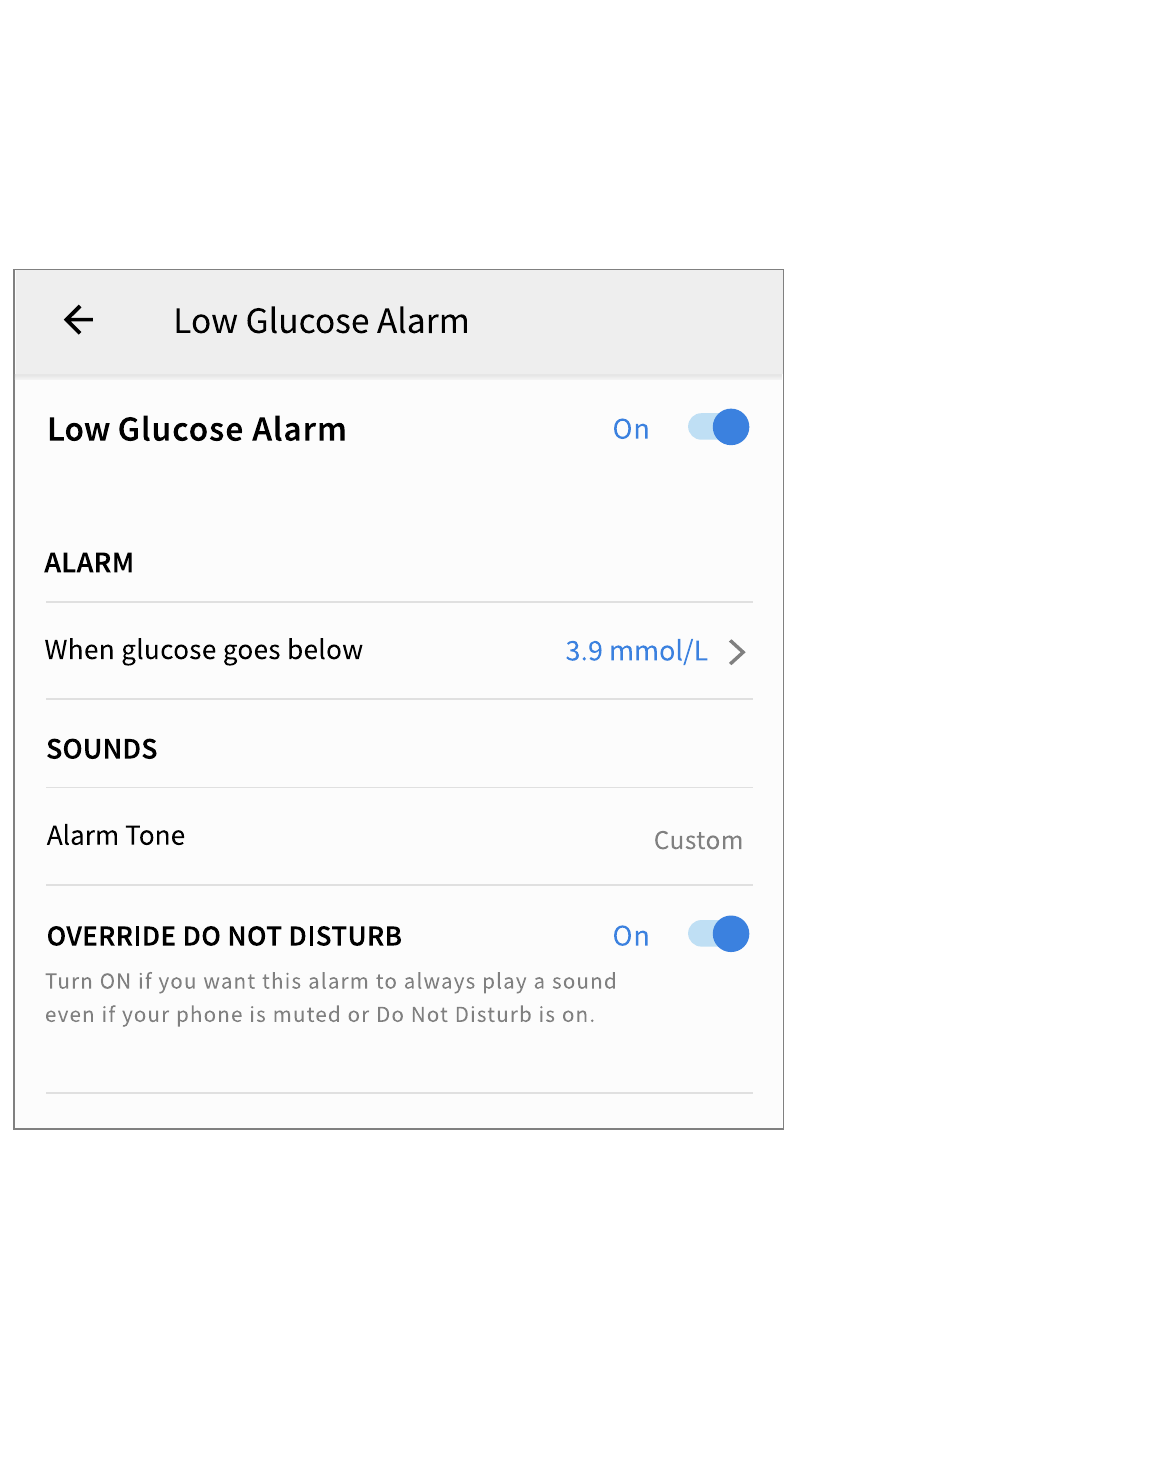
volume is muted.
Note: You must accept the App’s permission request for Do Not Disturb access
permission to use this feature. You can also enable the Do Not Disturb access
setting directly from the App’s notification settings.
5. Tap the back button to return to the main alarm settings screen.
High Glucose Alarm
1. The High Glucose Alarm is o" by default. Tap the slider to turn the alarm on.
2. If the alarm is on, you will be notified when your glucose rises above the alarm
level, which is initially set to 13.9!mmol/L. Tap to change this value between
6.7!mmol/L and 22.2!mmol/L. Tap SAVE.
3. Choose the sound for this alarm. Volume and vibration will match your phone
ART46090-003_rev-A 08-Apr-22 12:30pm
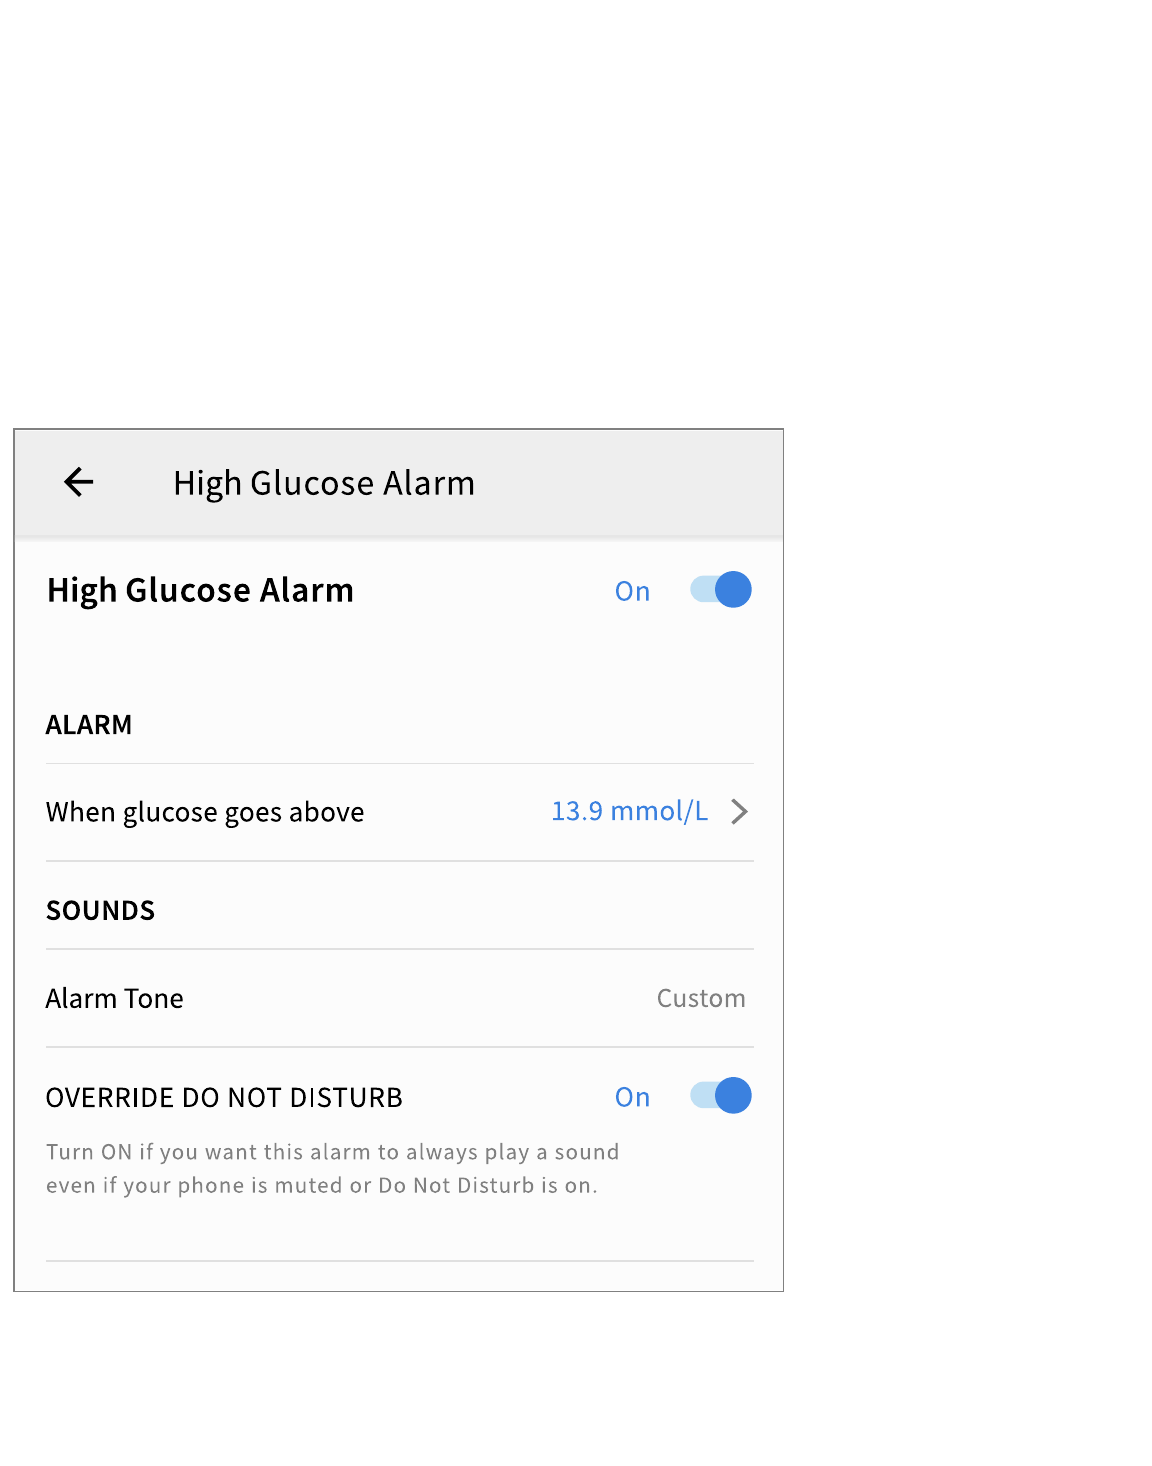
settings. Tap SAVE.
4. To override your phone’s sound and vibration settings, select whether to turn
on Override Do Not Disturb for this alarm. Turn ON if you want the alarm to
always play a sound and appear on the lock screen, even if your phone’s Media
volume is muted.
Note: You must accept the App’s permission request for Do Not Disturb access
permission to use this feature. You can also enable the Do Not Disturb access
setting directly from the App’s notification settings.
5. Tap the back button to return to the main alarm settings screen.
Signal Loss Alarm
1. The Signal Loss Alarm is o" by default. Tap the slider to turn the alarm on. If the
ART46090-003_rev-A 08-Apr-22 12:30pm

alarm is on, you will be notified when your Sensor has not communicated with
the App for 20 minutes and you are not receiving glucose readings or Low or
High Glucose Alarms.
Note: The Signal Loss Alarm automatically turns on the first time you turn the
Low or High Glucose Alarm on.
2. Choose the sound for this alarm. Volume and vibration will match your phone
settings. Tap SAVE.
3. To override your phone’s sound and vibration settings, select whether to turn
on Override Do Not Disturb for this alarm. Turn ON if you want the alarm to
always play a sound and appear on the lock screen, even if your phone’s Media
volume is muted.
Note: You must accept the App’s permission request for Do Not Disturb access
permission to use this feature. You can also enable the Do Not Disturb access
setting directly from the App’s notification settings.
4. Tap the back button to return to the main alarm settings screen.
ART46090-003_rev-A 08-Apr-22 12:30pm
Using Alarms
Low Glucose Alarm notifies you if your glucose drops below the level you set.
Open the App or tap the Dismiss button to dismiss the alarm. You will only receive
one alarm per low glucose episode.
High Glucose Alarm notifies you if your glucose rises above the level you set.
Open the App or tap the Dismiss button to dismiss the alarm. You will only receive
one alarm per high glucose episode.
ART46090-003_rev-A 08-Apr-22 12:30pm
Signal Loss Alarm notifies you if your Sensor has not communicated with the App
for 20 minutes and you are not receiving glucose readings or Low or High Glucose
Alarms. Signal loss could be caused by the Sensor being too far away from your
phone (over 10 metres (33 ft)) or another issue such as an error or problem with
your Sensor. Open the App or tap the Dismiss button to dismiss the alarm.
Note:
If you do not dismiss a glucose alarm notification, you will receive it every 5
minutes while your glucose remains high or low. Once you dismiss the alarm
notification, the alarm will not present again until your next high or low glucose
episode.
Only your most recent alarms will display on your screen.
Adding Notes
Notes can be saved with your glucose readings to help you track food, insulin and
exercise. You can also add your own comment.
1. Tap
on the Home Screen.
2. Select the tick box next to the notes you would like to add. After you tick the
box, you can add more specific information to your note.
Food notes: Enter meal type and grams or portion information
Insulin notes: Enter the number of units taken
Exercise notes: Enter intensity and duration
ART46090-003_rev-A 08-Apr-22 12:30pm
3. Tap DONE to save your note.
Notes you add are shown on your glucose graph and in your Logbook as symbols.
Low or high glucose alarms you receive will also be shown in the Logbook. You can
review a note by tapping its symbol on your glucose graph or by going to the
Logbook. See
Reviewing Your History for more information about the Logbook. To
edit a note from the glucose graph, tap the symbol and then tap the
. Tap DONE
when you are finished.
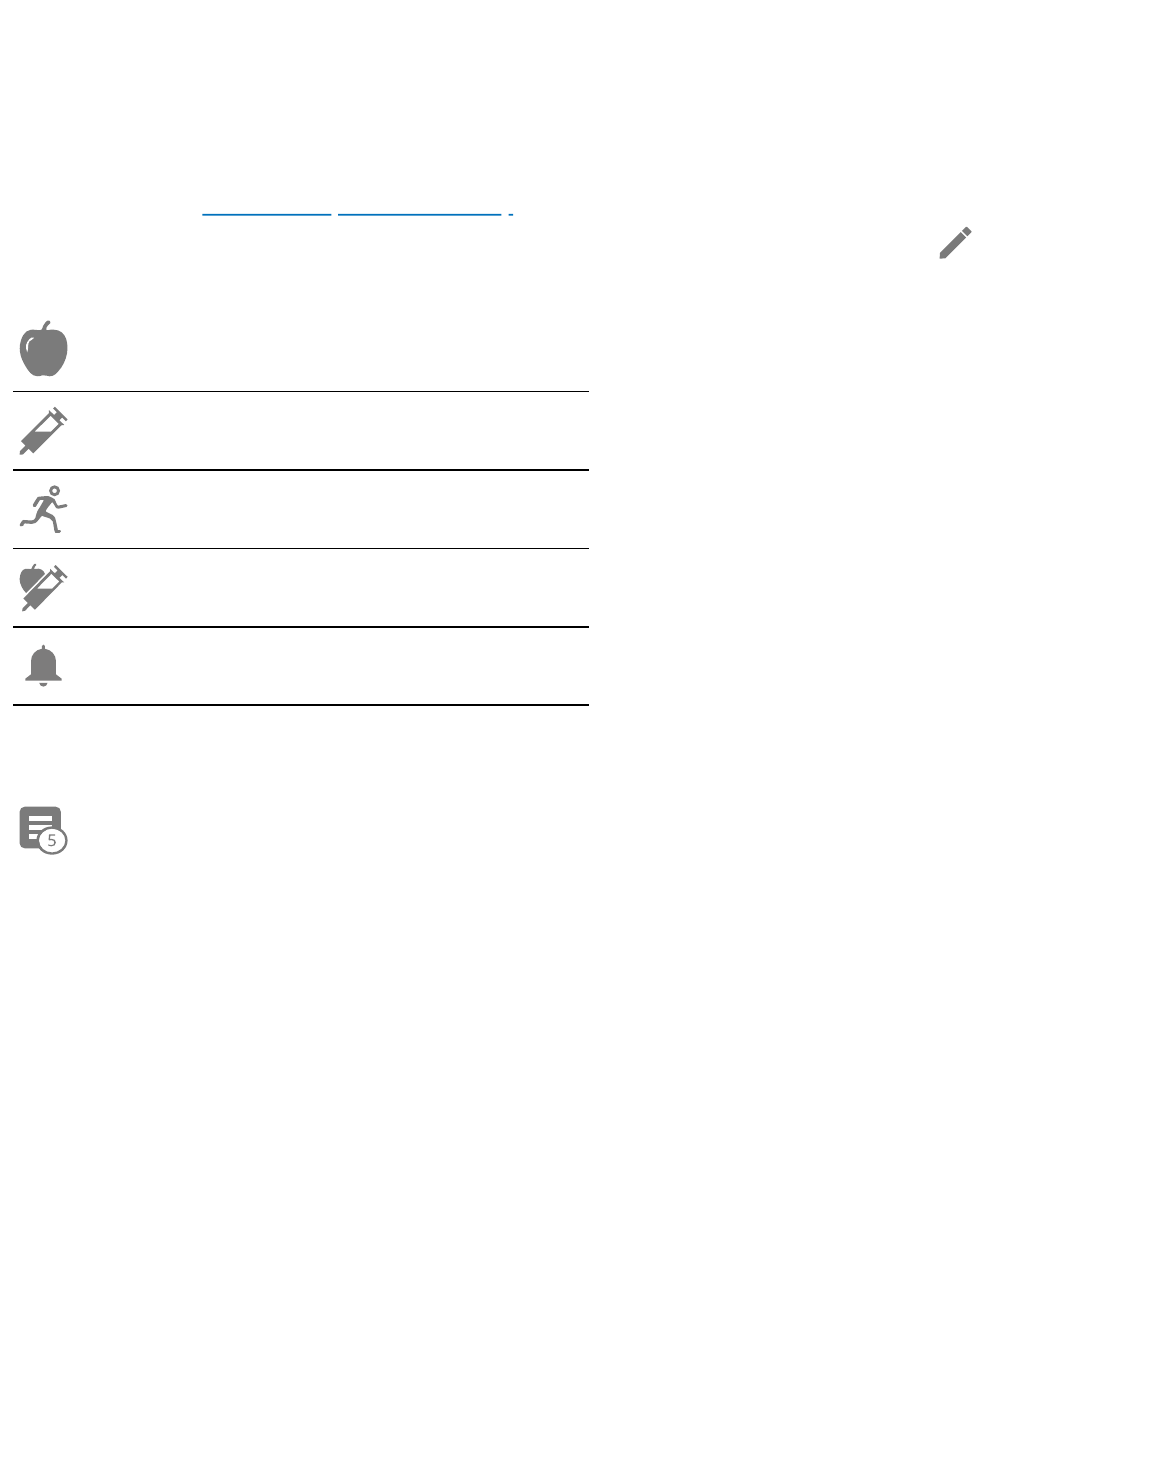
Food
Insulin (Rapid or Long-acting)
Exercise
Food + insulin
Alarm
Multiple/Custom notes – indicates
di"erent types of notes entered
together or notes entered within a
short period of time. A numbered
badge next to the symbol indicates
the number of notes.
Reviewing Your History
Reviewing and understanding your glucose history can be an important tool for
improving your glucose control. The App stores about 90 days of information and
has several ways to review notes and past alarm data. From the Main Menu, tap
Logbook to view the Logbook or tap on one of the other history options under
Reports.
IMPORTANT: Work with your healthcare professional to understand your glucose
history.
Logbook
ART46090-003_rev-A 08-Apr-22 12:30pm
The Logbook contains entries for notes you added as well as each time you
received a low or high glucose alarm. If you would like to view a di"erent day, tap
the
symbol or use the arrows. To add a note to a Logbook entry, tap on the
entry and then tap the
symbol. Select your note information and tap DONE.
To add a note that is independent of a Logbook entry, tap the
symbol on the
main Logbook screen. Tap the
symbol if you want to add a note on a di"erent
date.
Other History Options
Daily Patterns: A graph showing the pattern and variability of your Sensor
glucose readings over a typical day. The thick black line shows the median
(midpoint) of your glucose readings. The light blue shading represents the 5th–
95th percentile range of your glucose readings. Dark blue shading represents the
25th–75th percentile range.
Note: Daily Patterns needs at least 5 days of glucose data.
Time In Ranges: A graph showing the percentage of time your Sensor glucose
readings were above, below or within certain glucose ranges. The Custom graph is
based on your Target Glucose Range, and the Standard graph is based on a Target
Range of 3.9!to 10.0!mmol/L.
Low Glucose Events: Information about the number of low glucose events
measured by your Sensor. A low glucose event is recorded when your Sensor
glucose reading is lower than 3.9!mmol/L for longer than 15 minutes. The total
number of events is displayed below the graph. The bar graph displays the low
glucose events in di"erent periods of the day.
Average Glucose: Information about the average of your Sensor glucose readings.
The overall average for the selected time period is displayed below the graph. The
average is also shown for di"erent periods of the day. Readings above or below
your Target Glucose Range are yellow, orange or red. Readings in range are green.
ART46090-003_rev-A 08-Apr-22 12:30pm
Daily Graph: A graph of your Sensor glucose readings by day. The graph shows
your Target Glucose Range and symbols for notes you have entered.
The symbol may appear indicating a time change. Gaps in the graph may
result or glucose readings may be hidden.
Sensor Usage: Information about how often you viewed your Sensor glucose
readings in the App and how much information has been captured from your
Sensor.
Glucose Management Indicator (GMI): Glucose Management Indicator uses
average Sensor glucose data. GMI* can be used as an indicator of how well your
glucose levels have been controlled.
*
The formula is based on the published reference:
GMI (%) = 3.31 + 0.02392 x (mean glucose!mg/dL)
GMI (mmol/mol) = 12.71 + 4.70587 x (mean glucose mmol/L)
Reference: Bergenstal, Richard M. et al. ‘Glucose Management Indicator (GMI): A New Term for Estimating A1C
From Continuous Glucose Monitoring.’ Diabetes Care, ADA, November 2018.
Note:
Tap the symbol on any report to share a screenshot of the report.
Tap the symbol to view a description of the report.
To view a di"erent report, from any report screen swipe left or right to view the
next or previous report.
On all reports except the Daily Graph, you can select to show information about
your last 7, 14, 30 or 90 days.
Removing Your Sensor
1. Pull up the edge of the adhesive that keeps your Sensor attached to your skin.
Slowly peel away from your skin in one motion.
ART46090-003_rev-A 08-Apr-22 12:30pm
Note: Any remaining adhesive residue on the skin can be removed with warm
soapy water or isopropyl alcohol.
2. Discard the used Sensor. See Disposal. When you are ready to apply a new
Sensor, follow the instructions in
Applying Your Sensor and Starting Your
Sensor. If you removed your last Sensor before it ended, go to ‘Start New
Sensor’
in the menu to start the new one. You will be prompted to confirm
that you would like to start a new Sensor.
Note: After removing your Sensor you may observe a slight bump at the
insertion site. This goes away quickly, usually in a day or two.
Replacing Your Sensor
Your Sensor automatically stops working after 14 days of wear and must be
replaced. You should also replace your Sensor if you notice any irritation or
ART46090-003_rev-A 08-Apr-22 12:30pm

discomfort at the application site or if the App reports a problem with the Sensor
currently in use. Taking action early can keep small problems from turning into
larger ones.
CAUTION: If the glucose readings from the Sensor do NOT seem to match with
how you feel, check to make sure that your Sensor has not come loose. If the
Sensor tip has come out of your skin, or your Sensor is coming loose, remove the
Sensor and apply a new one.
Setting Reminders
You can create single or repeating reminders to help you remember things like
checking your glucose or taking insulin. You can also set a reminder to remind you
to check your alarm settings if you have disabled your alarms temporarily. There is
one default reminder to help you remember to check your glucose. This Check
Glucose reminder can be changed or disabled but cannot be deleted.
Note: To receive reminders, make sure notifications for the App are enabled. If you
want to receive a sound/vibration with your reminder, ensure that sound/vibration
on your phone is turned on, sound is set at a level you can hear and your phone’s
Do Not Disturb feature is turned o". If Do Not Disturb is on, you will only see your
reminder on the screen.
1. To add a new reminder, go to the Main Menu and tap Reminders. Tap ADD
REMINDER.
2. Name your reminder.
3. Tap the time fields to set the time for the reminder.
Note: If you would like the reminder to repeat, tap the slider to the right. You
can also select which days you would like to receive the reminder.
4. Tap DONE. You will now see your reminder on the list along with the time you
will receive it.
Note:
To turn o" a reminder, tap the slider to the left.
To delete a reminder, swipe the reminder to the left and tap the symbol.
The Check Glucose reminder cannot be deleted.
ART46090-003_rev-A 08-Apr-22 12:30pm

Your reminders will be received as notifications that you can swipe or tap to
dismiss.
Settings and Other Options in the Main Menu
You can go to the Main Menu to manage LibreView account settings.
Settings
App Settings:
Unit of Measurement – View the glucose unit of measure used in the App.
Report Settings – Work with your healthcare professional to set your Target
Glucose Range, which is displayed on glucose graphs in the App and used to
calculate the Time in Ranges Custom report. The Target Glucose Range setting will
not set glucose alarm levels. Tap SAVE when you are done.
Carbohydrate Units – Choose grams or portions for food notes that you enter. Tap
SAVE when you are done.
Account Settings:
Note: You must have a LibreView account and be signed in to manage Account
Settings. To sign into an existing account or create a new account choose Sign In
from the Main Menu.
Account Settings – View/change your LibreView account information.
Account Password – Change your LibreView account password.
Connected Apps
Note: A LibreView Account is required to manage Connected Apps.
The Connected Apps option in the Main menu opens a web browser within the
App. It may list di"erent apps you can connect with to share your data. To connect
ART46090-003_rev-A 08-Apr-22 12:30pm

your data with apps listed in the Connected Apps option, select them from the list
of apps, and follow the onscreen instructions. If there is an issue with Connected
Apps, you may see this icon .
Help
View in-app tutorials, access the App's User Manual and review the App’s legal
information. You can also view the Event Log, which is a list of events recorded by
the App. This may be used by Customer Service to help troubleshoot.
About
View App software version and other information.
Living with your Sensor
Activities
Bathing, Showering and Swimming: Your Sensor is water-resistant and can be
worn while bathing, showering or swimming. Do NOT take your Sensor deeper
than 1 metre (3 ft) or immerse it longer than 30 minutes in water. Note that
bluetooth performance may be impacted if using the system while underwater.
Sleeping: Your Sensor should not interfere with your sleep. If you have reminders
set to go o" while you are sleeping or have glucose alarms set, place your phone
nearby.
Travelling by Air: You may use your System while on an aircraft, following any
requests from the flight crew. You can continue to get Sensor glucose readings and
alarms after you put your phone in aeroplane mode, as long as Bluetooth is
enabled.
IMPORTANT: Glucose alarms will not be issued while your phone is in aeroplane
mode unless you enable Bluetooth.
Some airport full-body scanners include X-ray or millimetre radio-wave, which
you cannot expose your Sensor to. The e"ect of these scanners has not been
evaluated and the exposure may damage the Sensor or cause inaccurate results.
ART46090-003_rev-A 08-Apr-22 12:30pm

To avoid removing your Sensor, you may request another type of screening. If
you do choose to go through a full-body scanner, you must remove your Sensor.
The Sensor can be exposed to common electrostatic (ESD) and electromagnetic
interference (EMI), including airport metal detectors.
Note: Changing the time a"ects the graphs and statistics. The
symbol may
appear on your glucose graph indicating a time change. Gaps in the graph may
result or glucose readings may be hidden.
Maintenance
The Sensor has no serviceable parts.
Disposal
Sensor:
Sensors must not be disposed of via municipal waste collection. Separate
collection for electrical and electronic equipment waste per Directive 2012/19/EU
in the European Union is required. Contact the manufacturer for details. As
Sensors may have been exposed to bodily fluids, you may wipe prior to disposing,
such as by using a cloth dampened with a mixture of 1 part household bleach to 9
parts water.
Note: Sensors contain non-removable batteries and must not be incinerated.
Batteries may explode upon incineration.
Sensor Applicator:
Please consult your local waste management authority for instructions on how to
dispose Sensor Applicators at a designated sharps collection site. Ensure the cap is
on the Sensor Applicator as it contains a needle.
Troubleshooting
This section lists problems that you may experience, the possible cause(s) and
ART46090-003_rev-A 08-Apr-22 12:30pm
recommended actions. If there is an error, a message will appear on the screen
with directions to resolve the error.
IMPORTANT: If you are having issues with the App, please keep in mind that
uninstalling the App will cause you to lose all historical data and end the Sensor
currently in use. Please call Customer Service if you have any questions.
Problems at the Sensor Application Site
Problem: The Sensor is not sticking to your skin.
What it may mean: The site is not free of dirt, oil, hair or sweat.
What to do: 1. Remove the Sensor. 2. Consider shaving and/or cleaning the site
with soap and water. 3. Follow the instructions in
Applying Your Sensor and
Starting Your Sensor.
Problem: Skin irritation at the Sensor application site.
What it may mean: Seams or other constrictive clothing or accessories causing
friction at the site OR you may be sensitive to the adhesive material.
What to do: Ensure that nothing rubs on the site. If the irritation is where the
adhesive touches skin, contact your healthcare professional to identify the best
solution.
Problems Starting Your Sensor
Display: Scan Error
What it may mean: The phone was unable to scan the Sensor.
What to do: Try scanning the Sensor again. The NFC antenna is located on the back
side of most Android phones. Scan your Sensor by touching the Sensor with the
BACK of your phone. Move your phone around slowly if needed. Proximity,
orientation and other factors can a"ect NFC performance. For example, a bulky or
metallic case can interfere with the NFC signal. Make sure you are not touching
any buttons on the phone or the screen.
ART46090-003_rev-A 08-Apr-22 12:30pm
Display: Sensor Already in Use
What it may mean: The Sensor was started by another device.
What to do: Your App can only be used with a Sensor started with the same
LibreView account. If you're unable to use the Sensor with your App, check your
glucose with the device that started it. Or, apply and start a new Sensor.
Display: Enable Bluetooth
What it may mean: The Bluetooth setting on your phone is turned o".
What to do: Go to your phone settings and enable Bluetooth.
Display: Incompatible Sensor
What it may mean: The Sensor cannot be used with the App. Check that you have
installed the app that is compatible with your Sensor. You may need to download a
di"erent app if your Sensor is not compatible.
What to do: Tap Learn More to find out what Sensors can be used. If you still have
questions, call Customer Service.
Display: Replace Sensor
What it may mean: The App has detected a problem with your Sensor.
What to do: Apply and start a new Sensor.
Problems Receiving Sensor Readings
Display: Sensor ready in X minutes
What it may mean: The Sensor is unable to provide a glucose reading during the
ART46090-003_rev-A 08-Apr-22 12:30pm
start-up period.
What do to: Check again after the duration specified on the screen.
Display: Replace Sensor
What it may mean: The App has detected a problem with your Sensor.
What to do: Apply and start a new Sensor.
Display: Check Sensor
What it may mean: The Sensor tip may not be under your skin.
What do to: Try to start your Sensor again. If you see ‘Check Sensor’ again on the
screen, your Sensor was not applied properly. Remove this Sensor and apply and
start a new Sensor.
Display: Sensor Ended
What it may mean: Your Sensor has ended.
What to do: Apply and start a new Sensor.
Display: Signal Loss
What it may mean: Sensor has not automatically communicated with the App in
the last 5 minutes.
What to do: Make sure your phone is within 10 metres (33 ft) of the Sensor and you
have not force-closed the App. Tap the
symbol for more information. Try turning
Bluetooth OFF then ON again. If that doesn't work, try turning your phone OFF
then ON again.
ART46090-003_rev-A 08-Apr-22 12:30pm
Display: Bluetooth O!
What it may mean: Bluetooth is turned o".
What to do: Go to your phone settings and enable Bluetooth.
Display: Sensor Error
What it may mean: The Sensor is unable to provide a glucose reading. Tap the
symbol for more information.
What do to: Check again after the duration specified in the message.
Display: Sensor Too Hot
What it may mean: Your Sensor is too hot to provide a glucose reading. Tap the
symbol for more information.
What to do: Move to a location where the temperature is appropriate and check
again in a few minutes.
Display: Sensor Too Cold
What it may mean: Your Sensor is too cold to provide a glucose reading. Tap the
symbol for more information.
What to do: Move to a location where the temperature is appropriate and check
again in a few minutes.
Display: Unexpected Application Error
What it may mean: The App has detected an unexpected error.
What to do: Shut down the App completely and restart.
ART46090-003_rev-A 08-Apr-22 12:30pm

Problems Receiving Glucose Alarms
What it may mean: You have not turned glucose alarms on.
What to do: Go to the main menu and then select Alarms. Choose the alarm you
want to turn on and set.
What it may mean: The Sensor is not communicating with the App or there may be
a problem with the Sensor.
What to do: The Sensor must be within range (10 metres (33 ft)) of your phone for
you to receive alarms. Make sure that you are within this range. You will see the
symbol when your Sensor has not communicated with the App in 5 minutes. If the
Signal Loss Alarm is on, you will be notified if there has been no communication
for 20 minutes. Try turning Bluetooth OFF then ON again. If that doesn’t work, try
turning your phone OFF then ON again. If the Signal Loss Alarm persists, contact
Customer Service.
What it may mean: One or more of the phone settings or permissions is incorrect.
What to do: Check to make sure that you have the correct settings and
permissions enabled on your phone to receive alarms.
Bluetooth is ON
Lock Screen notifications are ON
Channel notifications or Pop-up notifications are ON
Battery Optimisation is OFF
Do Not Disturb Access permission is ON
Phone Media volume is ON
Go to
Setting Alarms for more information.
ART46090-003_rev-A 08-Apr-22 12:30pm
What it may mean: You may have set an alarm level that is higher or lower than
you intended.
What to do: Confirm your alarm settings are appropriate.
What it may mean: You have already dismissed this type of alarm.
What to do: You will receive another alarm when a new low or high glucose
episode starts.
What it may mean: You have closed the App.
What to do: Make sure the App is always open in the background.
What it may mean: Your Sensor has ended.
What to do: Replace your Sensor with a new one.
What it may mean: If you are using peripherals such as wireless headphones or a
smartwatch, you may receive alarms on only one device or peripheral, not all.
What to do: Disconnect headphones or peripherals when you are not using them.
What it may mean: The FreeStyle Libre 3 app was put to sleep by the phone
operating system.
What to do: Put the FreeStyle Libre 3 app on the list of apps that will not be put to
sleep.
Customer Service
Customer Service is available to answer any questions you may have about the
ART46090-003_rev-A 08-Apr-22 12:30pm

FreeStyle Libre 3 system. Please go to www.FreeStyleLibre.com or refer to the
product insert in your Sensor Kit for your Customer Service phone number. A
printed copy of this User's Manual is available upon request.
Reporting of Serious Incidents
If a serious incident has occurred in relation to this device, it should be reported to
Abbott Diabetes Care. Please go to
www.FreeStyleLibre.com or refer to the product
insert in your Sensor Kit for your Customer Service phone number.
In European Union Member States, serious incidents should also be reported to
the competent authority (the government department responsible for medical
devices) in your country. Please refer to your government website for details of
how to contact your competent authority.
A 'serious incident' means any incident that directly or indirectly led, might have
led or might lead to:
- The death of a patient, user or other person,
- The temporary or permanent serious deterioration of a patient's, user's or other
persons' state of health.
Sensor Specifications
Sensor glucose assay method: Amperometric electrochemical sensor
Sensor glucose reading range: 2.2 to 27.8!mmol/L
Sensor size: 2.9!mm height and 21!mm diameter
Sensor weight: 1 gram
Sensor power source: One silver oxide battery
Sensor life: Up to 14 days
Sensor memory: Up to 14 days (glucose readings stored every 5 minutes)
Operating temperature: 10°C to 45°C
ART46090-003_rev-A 08-Apr-22 12:30pm
Sensor Applicator storage temperature: 2°C and 28°C
Operating and storage relative humidity: 10–90%, non-condensing
Sensor water resistance and ingress protection: IP27: Can withstand immersion
into one metre (3 ft) of water for up to 30 minutes. Protected against insertion of
objects >!12!mm diameter.
Operating and storage altitude: -381!metres (-1,250!ft) to 3,048!metres (10,000!ft)
Radio Frequency: 2.402–2.480 GHz BLE; GFSK; 4.6 dBm EIRP
Sensor transmission range: 10 metres (33 ft) unobstructed
Labelling Symbols and Definitions
Consult instructions for use
Temperature limit
Manufacturer
Date of manufacture
CE Mark
Authorised Representative in the
European Community
Importer
Single sterile barrier system with
protective packaging outside
Batch code
ART46090-003_rev-A 08-Apr-22 12:30pm
Type BF applied part
Do not re-use
Use-by date
Catalogue number
Serial number
Caution
Sterilised by irradiation
!
Sterile Barrier. Refer to
Instructions for Use if opened or
damaged.
Humidity limitation
Do not use if package is
damaged.
For Sterile Barrier: Do not use if
the product sterile barrier
system or its packaging is
compromised.
This product must not be
disposed of via municipal waste
collection. Separate collection for
electrical and electronic
equipment waste per Directive
2012/19/EU in the European
Union is required. Contact the
ART46090-003_rev-A 08-Apr-22 12:30pm

manufacturer for details.
Electromagnetic Compatibility
The Sensor needs special precautions regarding EMC and needs to be installed
and put into service according to the EMC information provided in this manual.
Portable and mobile RF communications equipment can a"ect the Sensor.
Use of accessories, transducers and cables other than those specified or
provided by Abbott Diabetes Care could result in increased electromagnetic
emissions or decreased electromagnetic immunity of this equipment and result
in improper operation.
The Sensor should not be used adjacent to or stacked with other equipment and
that if adjacent or stacked use is necessary, the Sensor should be observed to
verify normal operation in the configuration in which it will be used.
Guidance and manufacturer’s declaration – electromagnetic
emissions
The Sensor is intended for use in the electromagnetic environment specified
below. The customer or the user of the Sensor should assure that it is used in such
an environment.
Emissions test: RF emissions; CISPR 11
Compliance: Group 1
Electromagnetic environment – guidance: The Sensor uses RF energy only for its
internal function. Therefore, its RF emissions are very low and are not likely to
cause any interference in nearby electronic equipment.
Emissions test: RF emissions; CISPR 11
Compliance: Class B
Electromagnetic environment – guidance: The Sensor is suitable for use in all
establishments, including domestic establishments and those directly connected
ART46090-003_rev-A 08-Apr-22 12:30pm

to the public low voltage power supply network that supplies buildings used for
domestic purposes.
Guidance and manufacturer’s declaration – electromagnetic
immunity
The Sensor is intended for use in the electromagnetic environment specified
below. The customer or the user of the Sensor should assure that it is used in such
an environment.
Immunity test: Electrostatic discharge (ESD); IEC 61000-4-2
IEC 60601 test level: ± 8kV contact; ± 2 kV, 4 kV, 8 kV, 15 kV air
Compliance level: ± 8kV contact; ± 2 kV, 4 kV, 8 kV, 15 kV air
Electromagnetic environment – guidance: Floors should be wood, concrete or
ceramic tile. If floors are covered with synthetic material, the relative humidity
should be at least 30%.
Immunity test: Power frequency (50/60 Hz); magnetic field; IEC 61000-4-8
IEC 60601 test level: 30 A/m 50 Hz or 60 Hz
Compliance level: 30 A/m 50 Hz or 60 Hz
Electromagnetic environment – guidance: Power frequency magnetic fields should
be at levels characteristic of a typical location in a typical domestic, commercial or
hospital environment.
Immunity test: Radiated RF; IEC 61000-4-3
IEC 60601 test level: 10 V/m; 80 MHz to 2.7 GHz; 80% AM at 1 KHz
Compliance level: 10 V/m; 80 MHz to 2.7 GHz; 80% AM at 1 KHz
Electromagnetic environment – guidance:
Immunity test: Proximity fields from RF wireless communications equipment; IEC
61000-4-3
ART46090-003_rev-A 08-Apr-22 12:30pm
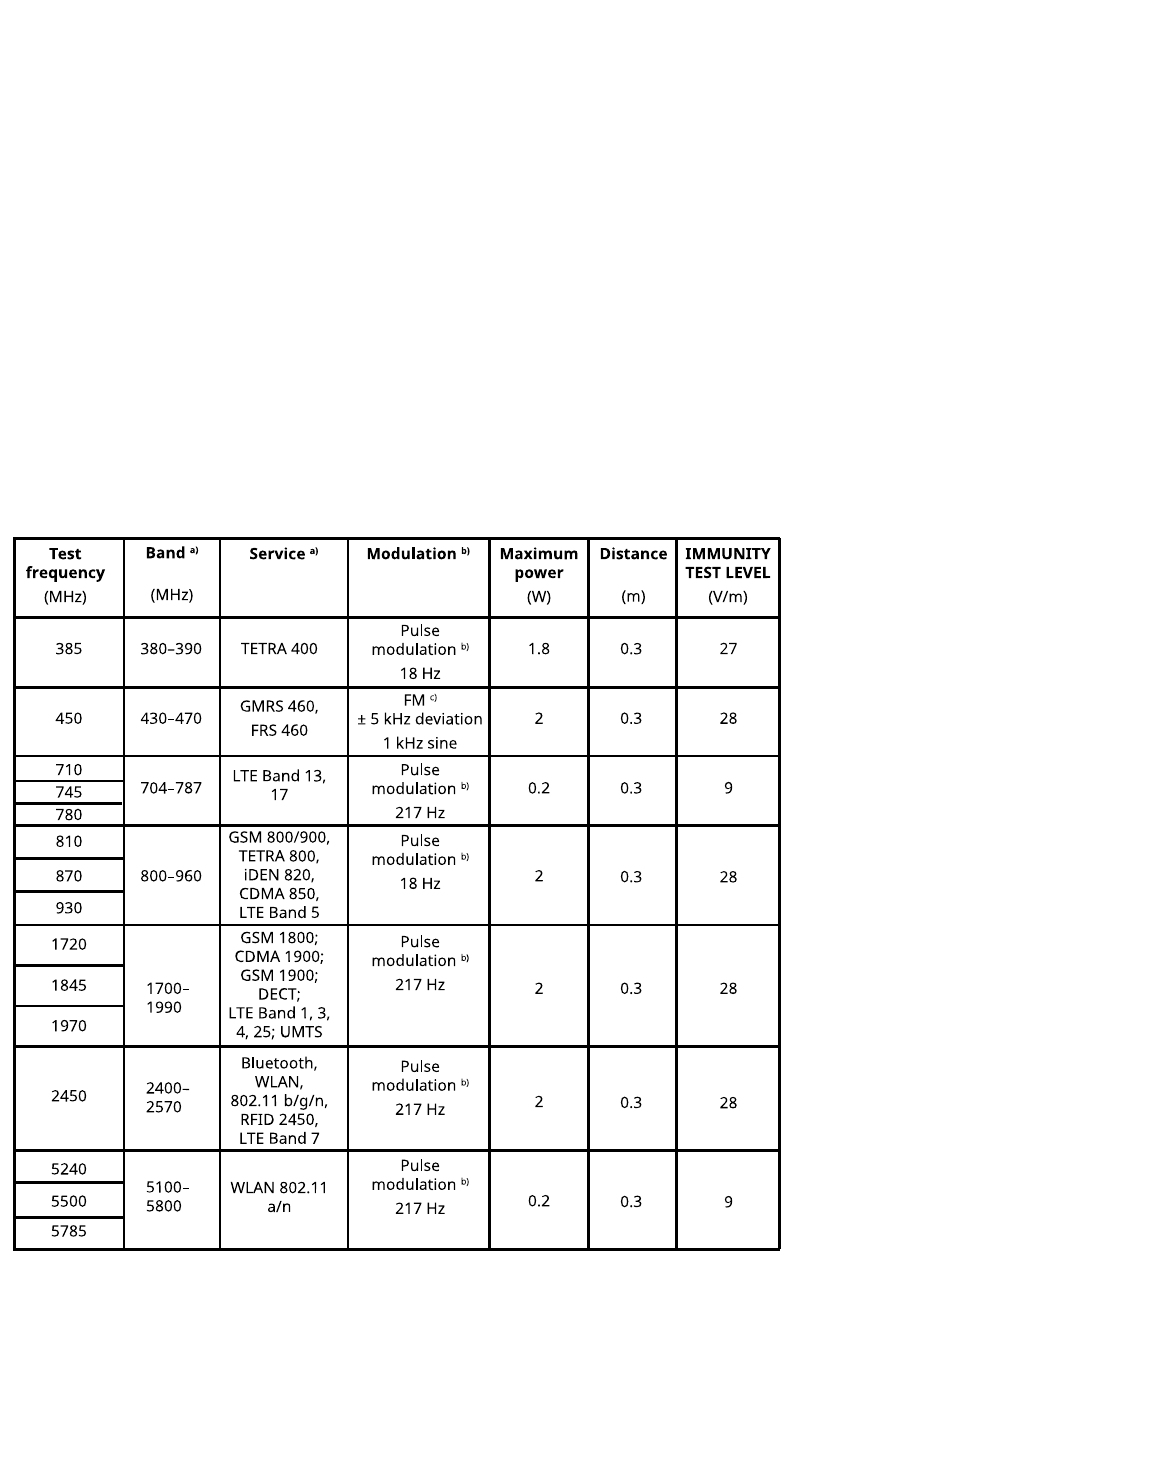
IEC 60601 test level: See table below
Compliance level: Compliance to the tested levels
Electromagnetic environment – guidance: Portable RF communications equipment
(including peripherals such as antenna cables and external antennas) should be
used no closer than 30 cm (12 inches) to any part of the System, including cables
specified by Abbott Diabetes Care. Otherwise, degradation of the performance of
the System could result.
The table below lists the immunity test levels at specific test frequencies for testing
the e"ects of some wireless communications equipment. The frequencies and
services listed in the table are representative examples in healthcare and in various
locations where the System may be used.
a)
For some services, only the uplink frequencies are included.
b)
The carrier is modulated using a 50% duty cycle square wave signal.
c)
As an alternative to FM modulation, 50% pulse modulation at 18 Hz may be used because, while it does not
represent actual modulation, it would be worst case.
Field strengths from fixed RF transmitters, as determined by an electromagnetic
ART46090-003_rev-A 08-Apr-22 12:30pm

site survey,
d
should be less than the compliance level in each frequency range.
e
Interference may occur in the vicinity of equipment marked with the following
symbol:
d
Field strengths from fixed transmitters, such as base stations for radio (mobile/wireless) telephones and
land mobile radios, amateur radio, AM and FM radio broadcast and TV broadcast cannot be predicted
theoretically with accuracy. To assess the electromagnetic environment due to fixed RF transmitters, an
electromagnetic site survey should be considered. If the measured field strength in the location in which
the Sensor is used exceeds the applicable RF compliance level above, the Sensor should be observed to
verify normal operation. If abnormal performance is observed, additional measures may be necessary,
such as re-orientating or relocating the Sensor.
e
Over the frequency range 150 kHz to 80 MHz, field strengths should be less than 10 V/m.
Performance Characteristics
Note: Please consult your healthcare team on how to use the information in this
section.
Performance Characteristics
Performance of the Sensor was evaluated in a controlled clinical study. The study
was conducted in 4 centres and a total of 100 subjects ages 4 years and older with
diabetes were included in the e"ectiveness analysis. Each subject wore up to two
Sensors for up to 14 days on the back of the upper arm. During the study, subjects
had their venous blood glucose analysed over up to three separate visits to the
clinical centre using the Yellow Springs Instrument Life Sciences 2300 STAT Plus™.
Three lots of Sensors were evaluated in the study.
Fig 1. Comparison of the Sensors vs. YSI reference.
ART46090-003_rev-A 08-Apr-22 12:30pm

Table 1. Regression analysis of the Sensors vs. YSI reference
Table 2. Sensor accuracy for all results vs. YSI reference
ART46090-003_rev-A 08-Apr-22 12:30pm
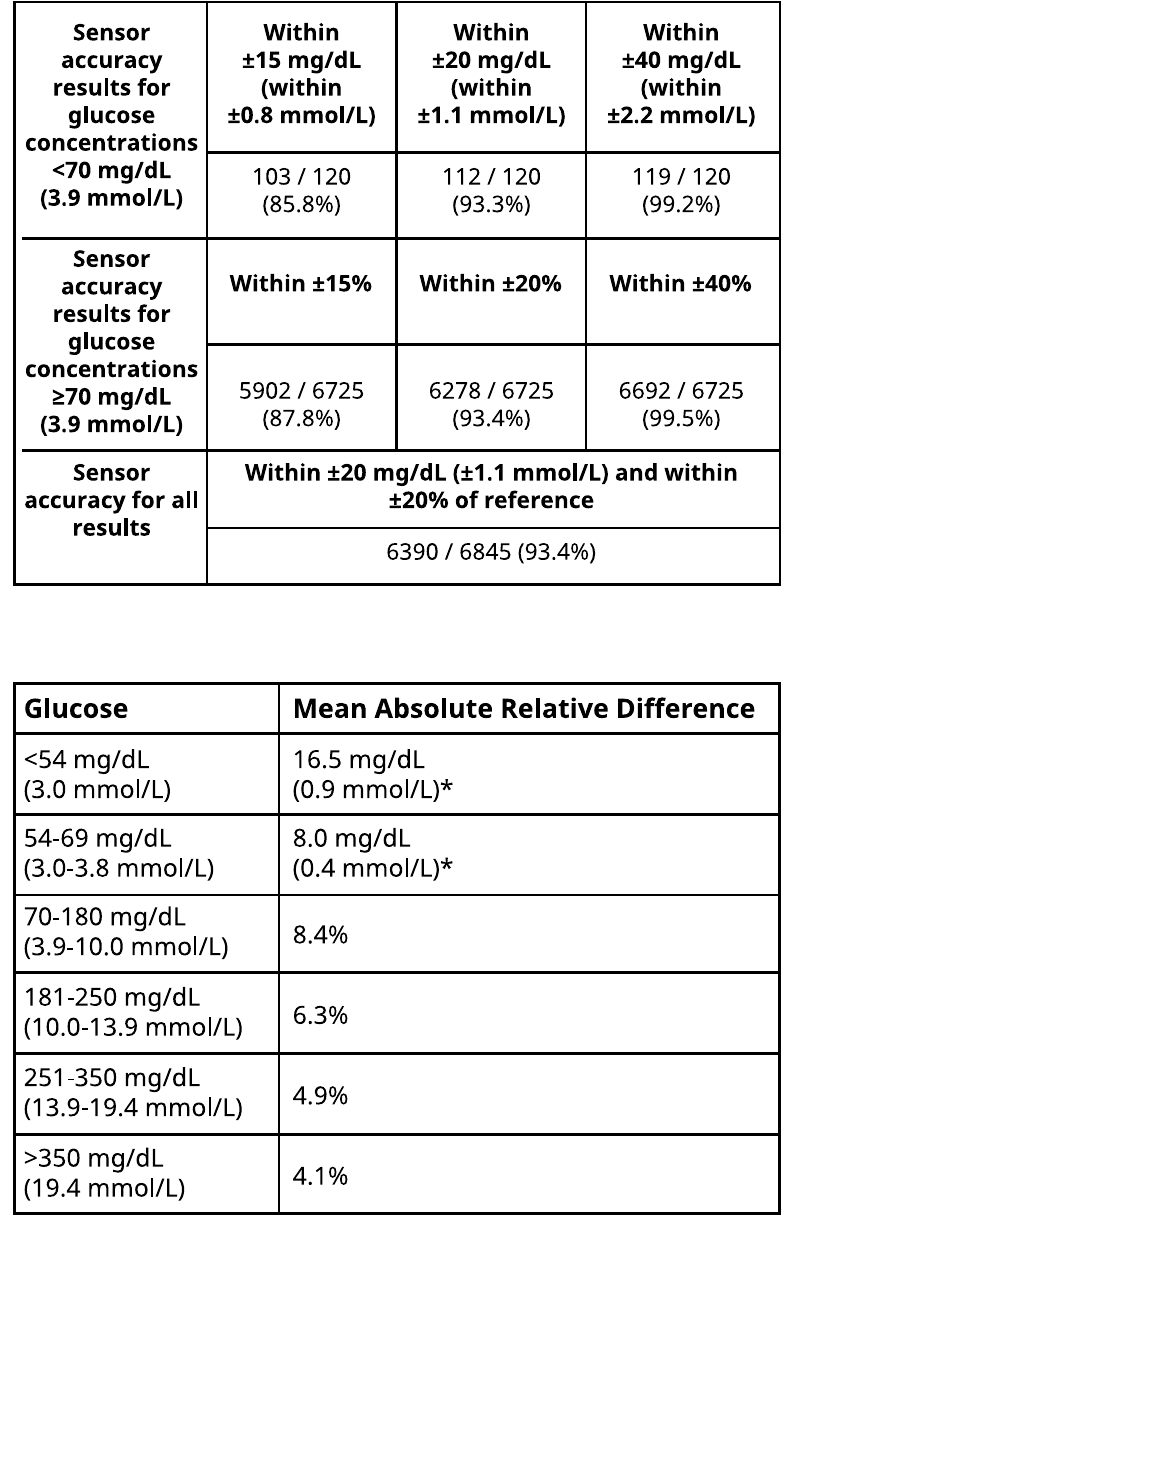
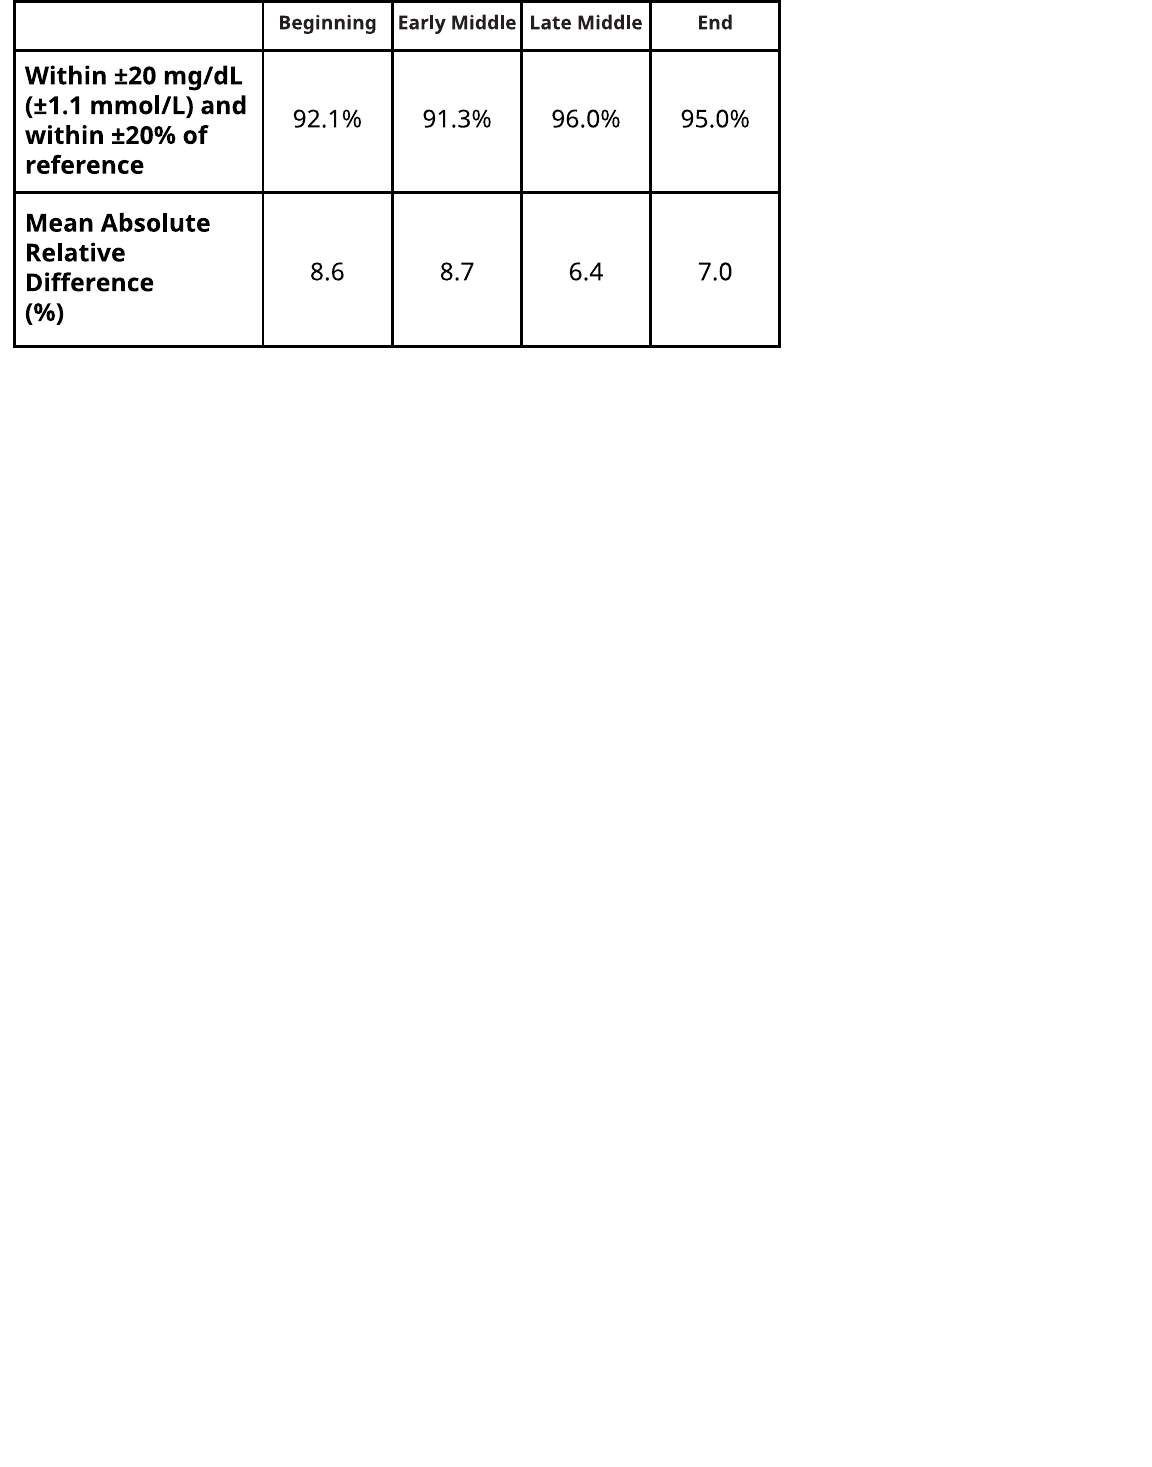
Table 3. Sensor performance relative to YSI reference at di"erent glucose levels
* For glucose ≤69!mg/dL (3.8!mmol/L), the di"erences in!mg/dL (mmol/L) are presented instead of relative
di"erences (%).
Table 4. Sensor accuracy over wear duration vs. YSI reference
ART46090-003_rev-A 08-Apr-22 12:30pm
Skin Interaction
Based on the examination of 101 study participants, the following incidence of skin
issues were observed. All skin issues were reported to be mild or moderate in
severity.
Bleeding – 3.0% of participants
Oedema – 1.0% of participants
Erythema – 5.0% of participants
Induration – 2.0% of participants
Itching – 1.0% of participants
Expected Clinical Benefits
Complications as a result of diabetes mellitus (including, but not limited to:
diabetic retinopathy, diabetic nephropathy) are well documented.
1
Self-monitoring
of blood glucose (SMBG) by patients has revolutionised management of diabetes.
2
Using glucose monitoring devices patients with diabetes can work to achieve and
maintain specific glycaemia goals. Given the results of the Diabetes Control and
Complications Trial (DCCT)
3
and other studies, there is broad consensus on the
health benefits of normal or near-normal blood glucose levels and on the
importance, especially in insulin-treated patients, of glucose monitoring devices in
treatment e"orts designed to achieve these glycaemic goals. Based principally on
the DCCT results, experts recommend that most individuals with diabetes should
attempt to achieve and maintain blood glucose levels as close to normal as is
ART46090-003_rev-A 08-Apr-22 12:30pm
safely possible. Most patients with diabetes, especially insulin treated patients, can
achieve this goal only by using glucose monitoring devices.
References
1. Textbook of Diabetes, Volumes 1 & 2; Pickup and Williams, 1999.
2. ADA Position Statement. Test of glycaemia in diabetes. Diabetes Care 2003;
26(Suppl.1) S106-108.
3. Diabetes Control and Complications Trial Research Group (DCCT): The e"ect of
intensive treatment of diabetes on the development and progression of long term
complications in insulin dependent diabetes mellitus. New Engl J Med, 329: 977-86;
1993.
Customer Service:
www.FreeStyleLibre.com
Patent:
www.Abbott.com/patents
FreeStyle, Libre, and related brand marks are marks of Abbott. Other trademarks
are the property of their respective owners.
©2022 Abbott
ART46090-003 Rev. A 04/22
ART46090-003_rev-A 08-Apr-22 12:30pm
